Class starts today. I decide to just post the whole 2 1/2 hour class here and not break it up into 2 parts. You can watch this over and over if you need to review a technique. It's been a busy Thanksgiving weekend here which I'm sure you can understand. I hope everyone had a very blessed Thanksgiving. The video is at the bottom of this post.
If you need any supply to make this quilt. I have most of them on my Etsy shop.just click the button on the bar above. My shops has Steam-A-Seam 2, scissors straight pins and other helpful items I talk about in my videos. Plus I will have thread packs that go with the Texas Wildflower kit.
The kit includes all the fabrics to make the flowers plus the pattern booklet.
I don't include a background fabric because this flower can go on so many fabulous background colors. the you pick the background it make it your own.
This flower is known as the Indian Blanket flower.
If you have any questions you can contact me on my Etsy shop or message me on FB. But I would watch the whole video be for you write because I cover a lot. Enjoy! melindabuladesigns@comcast.net
New class is coming Saturday November 28. That just means that I will post the class on that date but you can watch it any time you want. You can always watch my classes here on my blog or on my YouTube channel. This is a free class about 2 1/2 hours long. I have broken it up into 2 parts, the second part will post on Saturday Dec 5, and covers how to thread play this quilt.
I thought you may want to know the history of this quilt. It was originally made for an auction that The Quilt Show had to raise money for a special quilter Libby Lehman who had a stroke plus other complication. If you don't know who Libby is you need to google her. She is a true Quilt Star. And helped paved the way for many quilters including myself.
The below video is my process of making the auction quilt back in 2014. I hand dyed most of the fabric for this quilt. After I watch video I wish I had some more of that background fabric. I love that print.
Later when making this pattern I had to simplified the number of fabrics in the quilt. I originally had 60 different colors of fabrics, which is not good for a pattern for the public. Now it has 20 and you can always add more.
I also found this beautiful song by Oran. It's call Every Flower. So appropriate don't you think?
If you would like to make this quilt you can find all the supplies on my Etsy shop. There is a Shop Botton above on the tab bar. I have patterns, kits that included fabrics and the pattern, yards of Steam-A-Seam 2 which is the fusible web I use and thread packs for the Texas Wildflower.
I hope you get inspired by this video and want to make your own Wildflower Quilt. You don't have to use Texas in the name. If you are from Illinois you can call it the Illinois Wildflower. It's all ok with me. But Libby is a Texan and I'm a Californian and we can all be wildflowers. Hope to see you back here for class on Saturday Nov 28.
Video's at at the bottom. So you will read the post!
Let’s get educated. Iv spent the last month working on making some “how to "or Tips and Tricks videos on how I do my technique for making my Art. Or as some of you may call it Quilt Art or Art Quilting! Call whatever you want but I’m creating and making stuff so I call it, Art and I use my sewing machine so that quilting so we have Quilt Art!
I get asked a lot of question about how I do what I do, why I use Steam-A-Seam 2 and how to handle the sticky that comes with this product. I thought I’d answer those question by doing a few videos. They will also be posted here on my blog so you can come back anytime and watch your favorites.They will also be on YouTube under Melinda Bula if I do all this tech-y stuff this right!
Let’s talk about fusible webs first. There are many fusible webs on the market today. The last time I counted it was close to 20 and growing. Here what you need to Know!They are not the SAME and are used for different fusing and quilting techniques! When your pattern or the instructor says to bring a certain kind of fusible web! Bring that fusible! That pattern and the instructors technique is based on that fusible web they are asking for. This is so important! all of us so called fusersare notdoing the same thing! its like we are called Quilters but under our sewing machine we are all doing different quilting techniques. Right! Same with fusing.
You can’t use just one fusible web for all these techniques. Just like the threads we use today, you have to buy the right thread for the technique you are doing. We now have many choices and that may not be all good. Are you confused yet?
In this blog and videos below, I’m just going to talk about the fusible I use. Steam-A- Seam 2. I have tried many. But come back to SAS2 for my technique. did you hear me say it. My technique.
I’m always up for something new! They are all good products. But fusing is not the same for every creative person out there. We are doing many different and unique techniques with fusible web.
And don't get mad at your quilt shop owner. They can't afford to carry all 20+ fusible webs under the cutting tables. That is why bring yards with me to classes when I teach and sell it on my Esty shop.

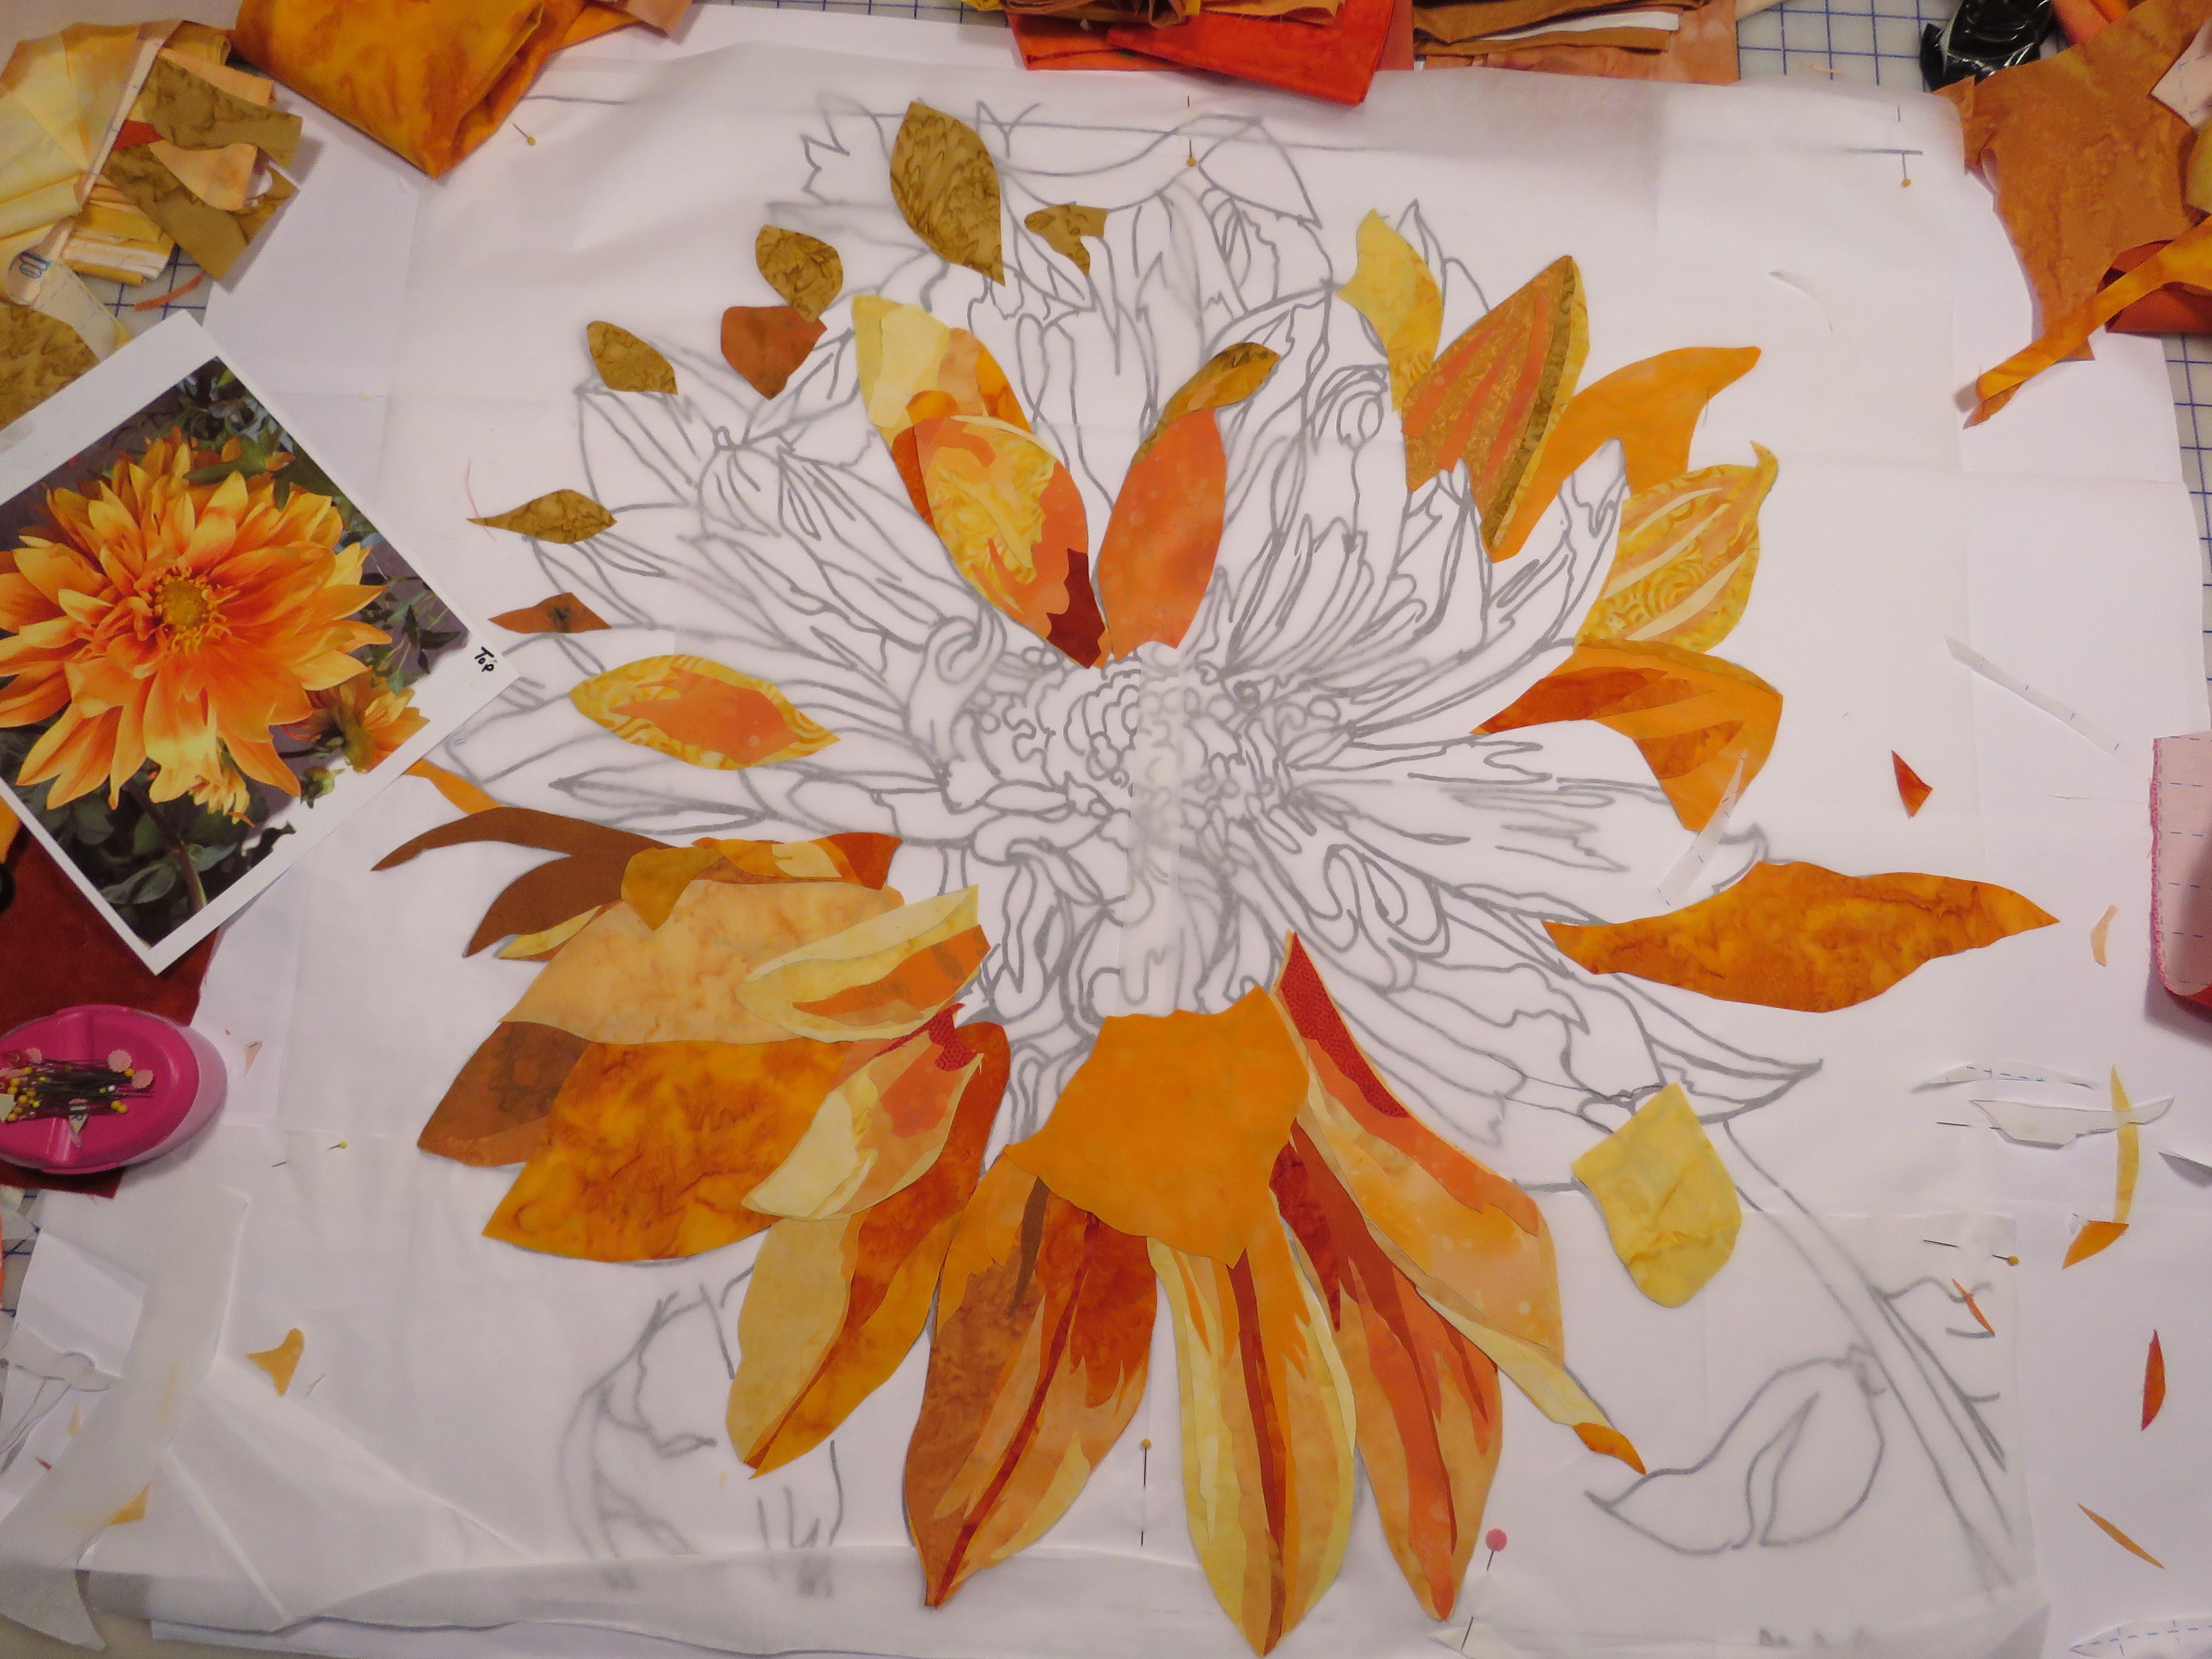
Every time you see a color change its another piece of fabric.
Ok, what’s my technique? I am laying or overlapping layers of fused fabric on top of each other just like you lay paint on top of other paint. That’s how I make my art quilt. Iv layered up to 6 layers and still been able to sew through it. The threads I add when quilting are another layer of color added to the composition. Steam-A-Seam 2 allow me to do that. And of course I have developed some tips and tricks I want to share with you.
And I don’t use the Lite Steam-A-Seam (Tip)It’s dose not stay adhered. When I’m trying to quilt my piece it lifts up off the fabric. when peeling it off the release paper half of it stay on one paper and the other half is on the other release paper. Which makes my students panic and have a bad experience!
First #1 video is about how to put the fusible web on the fabric! There are tricks that make it easy to use.
Video #2 is how to deal with all the sticky and how to clean it off all your sewing tools. That means your scissors also. Did you know there are special scissors that work better with sticky fusible web?
Hope these videos will answer some of questions? You can leave questions below or on YouTubeand I will try and answer them. Remember the video is just talking about my technique and using Steam-A-Seam 2.
NOTE: no company is asking me or paying me to do this. I just have a lot of experience with this fusible and watching 1,000's of students a year using it. I figure last year I bought about 2,000 yards the sticky stuff for myself and student.
I
am not sure if this is an orange or yellow dahlia. But oh, I love them so much.
There are some beautiful dahlias on show at certain times of the year at the
Fort Bragg Botanical Gardens. I was in heaven. This is one of the pictures I
took and started when I got home. Could not wait to make it into an art quilt.
I did a video of the process of making this flower. I am also showing you the
steps I take to make my art quilts. I also was using my Color Finder tool I
invented for my students when I do a week long retreat. It helps them find the
right value and color in their photo. I have a retreat coming up in February
21-26, 2021. I so hope we get to go. It is withEmpty Spools Seminarsin beautiful Pacific Grove, California. I love being there
and teaching students that have never done art quilts on how to do it. Or
encourage the creative person that just needs a gentle push with a few tips and
tricks thrown in for good measure. Check out their web site if you are
interested.
But the sad thing is I did not get to finish this beautiful flower quilt. I got busy teaching and traveling. Then we moved but I was still longing to get back to it right a way. Then we had this fire……
You guess it. Its gone. But I still have the photo and my love for this picture and the colors has now intensified. And now I have time. So, this is a video of how I do my flower art quilts. I call them paintings with out using any paint. All my quilts are made with just fabric and then thread. There is no paint. I hope you enjoy.
Oh, and I love this song. But is it yellow or orange? let me know.
It is so exciting to get this NEW 3 Zinnia quilt done. I hope
this class will help you through the process of making this spectacular
flower quilt.
I give a lot of tips and tricks to handling 3 flowers at
once that will help even if you are only making one flower. I have put some
chapter time stamps on this video so you can easily find something you want to review
again or if you want to skip ahead.
9:08 Numbering Your Petals
10:40 Layering the Centers
13:48 Arranging the Centers
20:53 Changing My Mind
24:09 Adding Layer #2
30:45 The Shadow Layer – Color D, E, F, G and H
34:00 Let's Press
36:03 Auditioning Background Fabrics
39:11 Free-Cutting Leaves
45:35 Arranging the Leaves
For the Thread Play on your Zinnia, you can watch my Zinnia Thread Play video here on this blog. You may also want to watch the Dogwood Finishing Class
#5, where I show how to do the leaves and there are A LOT of leaves. These
are all free. I love to use variegated green
thread on my leaves and I have some of that thread in my shop.
If you feel timid about free-motion quilting through fusible web you may want to take my online class through the American Quilt Society at iquilt.com. My class is called Renegade Thread Play and you can watch it repeatedly. There is also a DVD by the same name at AQS.
The history of making the 3 Zinnia quilt starts several years ago with me dying fabrics for my upcoming classes at the International
Quilt Festival in Houston. I had seen past students having trouble with color and values and I thought that if I
could make kits, they would all be successful and that is all a good instructor wants - for their students to be successful. So I became
a dyeing machine. Morning, noon, and night, I was in the dying studio (the garage) working on perfecting my colors. It was a
lot of hard work but it paid off. Then, fear set in and I panicked - what if these colors suck together.
I decided I'd better make some flowers and be sure the colors worked together. 100 of yards of fabric were already dyed, so I spent the remaining days before I left to teach this class making the 3 Zinnia quilt. Thank
God it all worked out. That was back in 2005 and I kept it up for a few years but I had to stop dying because I couldn't keep up with the demand and still have a life. Luckily, I found that Hoffman of
California has a Watercolor collection that looks just like my hand-dye fabrics. Okay, maybe better.
Now, everyone wants to make the 3 Zinnia and asks me when will I have a pattern for that? Good news, I already have the pattern for it. It's all the
same flower - I just changed their colors and laid them facing different ways on
the background fabric. One pattern, 3 colors, and one big 44” x 44” piece of
background fabric.
This class is about
how to make the 3 Zinnia using one pattern in 3 different colorways. I’m not
showing you how to fuse - you can go to (How I use Steam A Seam 2) or how to quilt - you can go to (Dogwood finishing class #5, Renegade Thread Play or iQuilt.com ) for all that. I will be showing you how to make 3 zinnias at once using one pattern.
If you have taken this class with me in the past and can find your pattern (and maybe an unfinished flower), this video will help you
complete that project and make even more flowers, if you want. If you need more fabrics in other
colorways to turn that single flower into a 3 Zinnia, I have fabric packs on my Etsy shop - look forJust Zinnia Fabric Packs - there are
4 colorways available.
If you want to take the 3 Zinnia class and don’t
have the pattern, go to Etsy - the link is up above on the bar. You can purchase theZinnia Kitin the color of
flower you like, then go toJust Zinnia Fabric Packs and pick 2 more colorways. Now you will have a custom quilt with your
favorite zinnia colors made from beautiful Hoffman batik fabrics, selected for
these flowers based on my hand-dyed fabrics.
Below are the colors I am using in the video - orange, berry and yellow.
What
is a Saturday without a new video post from me? I made a new video called Zinnias on
Parade - these are pictures from classes I've taught all over the country and at
big shows. I thought you might like to see students' progress in a one day, 6-hour class. These beauties are in different stages of
development and some of the fabrics used for these flowers were made from my hand-dyed fabrics (made in my garage) from back in the day. Some are the student’s
own fabrics, too, and they are all beautiful no matter what fabric they used. One of my
favorite zinnias in the video is the green one made by my friend, Pam Hough. I hadn't met her until this class and when she walked in with these green fabrics, I squealed with joy. I think I scared her at first but that's how I roll.
Now
here is the reason for this blog. There are a lot of these zinnia flowers out there in the world and some of you have not finished yours. Don't worry, I'm not going to name names. I would just like to help you finish them since we
are still in lock-down. OK, is it just me that’s still in lock-down? You never know these days. Anyways, lets
finishes these zinnia quilts.
Click the arrow to watch the video.
Now here is the surprise. I am making a new video class about how to make a 3 Zinnia Quilt out of one pattern in 3 different colorways.
I will show you how to free-cut the leaves, what size fabric to use, and how to notget confused while making 3 flowers at once. I have a few tricks for making these flowers quicker and easier than you think. Plus, we will talk about quilting your flower. So, check out the video here on this blog to get you excited. If you subscribe to my YouTube channel you will get a notification each time I post a new how-to video. Oh, and did I say this is free?
Well, here's the last class in the Dogwood series. I've has much fun teaching you this pattern and I hope you are having fun, too, making a
beautiful Dogwood quilt.
It's hard to write a post and watch a very smart and active granddaughter but I am trying.
Pool time! It's 100 degrees and the air conditioning went out...
First,grandpa has to get her out of the sink...
...then grandpa gave her a cream cheese bagel in the living room.
I will be introducing new patterns and kits in the future but the Dogwood classes will have the most
detailed instructions. You can come back
and refer to these as you work on other patterns. I will keep these available to
you on YouTube and my blog. You may want to subscribe to my YouTube channel so you will
not miss any upcoming classes or tips on future patterns. I have a lot more
to share in the future!
Click on the arrow above to watch class #5.
This video is not as long as the first four but is very informative - it's 30 minutes and chock full of information.
Renegade Thread Play on the back of the Dogwood quilt.
My wish is for those of you that watched the classes to feel
more confident in trying something outside your safety zone. Remember, you can always fix a mistake or start
over. It's only fabric.
So, if you are ready to take the next step, which is working from
your own photo, come join me in Pacific Grove (on the beach in central California) next year for the Empty Spools Seminars, February 21-26, 2021.
At Empty Spools, I will walk you through the
steps of making a pattern from your own photo, how to enlarge it, and create a palette
of fabrics. I show you how to pull out your creativity and create that next masterpiece. This is a place where you can truly focus on your project and I am there to hold your hand if you
need it. I've been teaching there since 2005 and it is so exciting for me to see students arrive somewhat timid with this process and leave with the confidence to succeed.
Thank you and I hope this series has increased your confidence in tackling that next project!
I
have been excited to make this video and show you how to finish your
Dogwood quilt or any other patterns you may have started in one of my
classes and longed to finish. I have taught a lot of classes over the
years and I know there are a lot of you wanting to finish your quilts. That is
why I am doing these videos. I know some have criticized, "she is giving
these away for free". I have had a great career and taught all
over the country and internationally.
I've
met a lot of wonderful people and they have bought my patterns and want to
finish their flower quilts. Now is the perfect time to finish that quilt since
we are stuck at home. So why not do a tutorial to help students finish their
quilts. It’s sad we can’t get together, take a class or go to a
quilt show. But we can still learn and finish those UFO's.
The Dogwood videos
has a lot of techniques that will be use in most, if not all my patterns. I can’t
make you a pro over night, but I can push you a little and give you some tricks
to make you successful. Just remember, this is just fabric, we can always get
more. No one is critical of your efforts, but you. So, stop it.
Life is too short.
Click on this box below to view Video
Supply
I use for this Renegade Thread Play class.
Sulky 40-weight Rayon
thread in an assortment of colors. Look at the fabric colors you use for
your flower. The lightest values and the darkest values.
Sewers Aid-important
Thread snip- I like
Karen Kay Buckley’s snip
Lots of bobbins- if we
use 15 threads you need 15 bobbins
Quilters Dream Batting
100% cotton- Request
Medium safety pins
Top Stitch or Jeans
Denim needles size, 80/12 or 90/14 - important
Supreme Slider
Some of these supplies
you can find on my Esty Shop. The link is on the gray bar above.
Welcome back, the link to the third class in the Dogwood series is below. There's a lot of information I need to cover in this video. I love my flower - I just got it done last Thursday and I cannot
wait to get the thread play going. This video, at 90 minutes, is longer than the first two. I did not want to split it into shorter classes because so many of
you are ready to get started. You can stop the video, work on your flower, then
start it up again.
I do want you to watch the whole video because there are
some fixes and corrections I make along the way and I want you to know how to do them. Below is a link to a page that you can print out - it lists some of the oopsies I cover in the video - you may want to print it out before you begin or watch how I make the fixes, then print it out. That is the fun part about taking a class - you get all the ins and outs plus tips and tricks.
Above is where we are before this class - after this class you will have something like the pictures below.
This is the Dogwood up on my studio wall.
For the seeds, I cut out at least 98 little circles. Relax, I'll show you a trick for cutting 4 at once.
The colors of the leaves just make the flowers pop.
I cant wait to get the Renegade Thread Play going.
This is a long holiday weekend and we are having a pool party with our granddaughter and the forecast is for triple digits by Monday(!). I will be posting the Renegade Thread Play video in 2 weeks (from air-conditioned comfort), so stay tuned!
I am SO glad you joined me for Dogwood Class #2. This video is going to cover a lot and is 45 minutes with resting spots along the way. In this video, I will cover:
How to fuse large pieces of fabric (like color A in this pattern)
Which pieces to cut out first
How the layout guide works
Adding the lining pieces to color A
How to use parchment paper sheets
Working with the first layer
How to choose a background fabric
There
is homework for next week, which is to fuse and cut out all your fabric pieces.
I discovered a new way to organize all those cut pieces, which I like better
than putting pieces in a little baggie. I saw the idea on the Fat Quarter Shop. Designer
Lori Holt made these little design boards covered in batting that hold your appliques while you are working on them. I also found that they hold my cut fused pieces until
I am ready to use them and I can stack them on top of each other so they
take up less space while I'm working.
At
the Fat Quarter Shop, they have a video on how to make these out of foam core
board. I did not have foam core, but I did have lots of cardboard boxes.
I cut my firm cardboard, my batting, and one piece
of fabric all 12” x 12”. Then I put Steam-A-Seam 2 on the back of the batting
and the back of the fabric. Next, I ironed them, peeled off the release paper, and put the
sticky side of the batting on one side of the cardboard and the fabric on the
other side and ironed them onto the cardboard. I then made 2 ¼ inch binding and hot glued
it around the edges of the exposed cardboard. Or you can just buy one pre-made for $12 from
the Fat Quarter Shop - they come is all sizes and colors.
I organized the boards by letter - 3 letters (colors) to a board. I put all my red hearts on one board and put that board on the top of the stack. This is going to help me find pieces when we do next week’s class.
Next
week, class #3, we will finish laying all the Dogwood flower pieces down and get it ready for Renegade
Thread Play in week #4.
I hope you are having fun doing this project. If you have any questions, you can
email me at melindabuladesigns@comcast.net
or leave a comment below.
If
you need supplies, kits, or patterns, you can find them at my Etsy shop - click on the link above this post on the gray bar.


