Showing posts with label Fusible flowers. Show all posts

Thursday, August 18, 2022

Dos and Don’ts When Choosing Fabrics for Your Flower Art Quilt


I’m writing this blog because I know many new-be quilters out there may need some guidance when choosing fabrics for a specific project. Specifically, one of my flower patterns or a landscaped, something that you want to give a realist/painterly look. It matters what kind of fabric you use. I’m going to speak specifically about my technique and using my flower patterns, but the concept works across the board. You can’t use any run-of-the-mill quilters stash for making these art quilts. So, what is my technique? I’m painting a painting using use fabrics. So, when you buy my patterns, you are to?

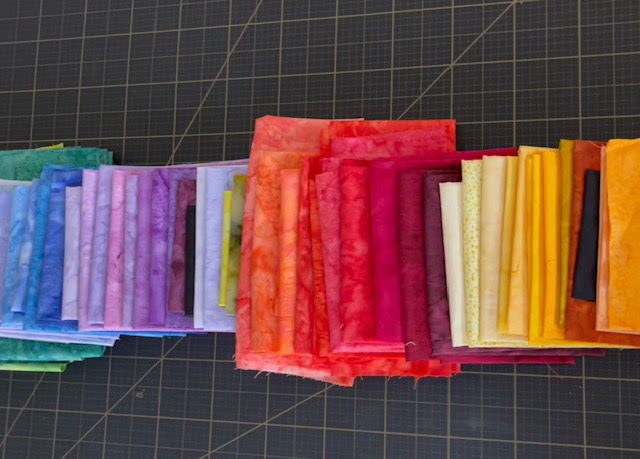
Batik fabrics were designed back in the day (thank you, Hoffman, of California); I had the idea of using them like paint because they had this watercolor feel, and I thought they would look like a painting. It is dyed in such a way to give a multi-colored and value feel like you look like it was painted, and they did, and they still do. Most realistic quilt artists use batiks and hand-dyed textures, even tone-on tones, to get that look.


First DON’T.  Don’t use solid fabrics when you want a painterly look in your flower quilts. It doesn’t work. It gives a very flat look with no dimension. Now, if that’s what you want? Go for it. But my patterns were designed, and the pieces are layered to give a watercolor look by using the right kind of fabrics with fabrics. We want the viewer to come up close and say,” did they paint that?”

Now for all the solid fabric designers out there, I love your fabrics and the colors. I buy them. They are beautiful. But not for making my realistic flower or landscape quilt.


Use the color chart in the pattern as a color and value reference. Look at how the colors relate to each other.” Is this one darker or lighter than the one on top?

Do you have value in your fabrics? The range of lights to darks is so essential. Remember, dark colors reseed, and light colors come towards you, just like painting a still life. And my flower patterns are a “still life.” The value rules change when doing landscapes. We will talk about that at another time.

Don’t skip making the color chart in every pattern. The pattern instructed you to make the color chart in your chosen colors first. Please do it! It’s a visual reference guide to help as you build your flower. Very important.

I hope this helps you when making your flower quilts. I have been working on turning some of my patterns into digital downloads, but I worry you will use the wrong fabrics.

I use batiks and hand-dyed fabrics to make my quits look like a painting without using paint. This is my secret for achieving that look.

 When I had a student bring their own fabrics to class, only 1% understood what to bring to class. But 99% of the students brought the wrong fabrics and went home unsuccessful. Not good. When I started making kits for the classes, all were successful, and learned how to make a flower look real by using the right fabrics. They discovered that fabric is now a painting tool.

Check out my video above for more fabric information.

Remember being a quilter require us to have many kinds of fabrics.


Saturday, April 24, 2021

How to use a scan and cut machine with a Melinda Bula Designs pattern


Today is the day! After 5 years of researching and playing around and a lot of trial and error, I have figured out how to use my cutting machine to cut out one of my patterns. Big deal, you say. Well, if you have ever taken a class with me, you know there is a lot of cutting with scissors around sometimes very tiny pieces to make one of my flower quilts. I love to cut but I also love to make flowers fast.

Over the years at quilt festivals, I have watched many demonstrations at the Brother booth on how to use their cutting machines but I just could not figure it out, until my house burnt down and COVID-19  hit and I finally had time to focus. So, I bought the machine with the intention of scrapbooking but started experimenting with fabrics in the machine right away. Oh, the messes I made.

Bad cutting! 


Good cutting

Yes, you could always use your cutting machine before with fabrics but not with Steam A Seam 2.  All my art quilts and patterns are made using my preferred fusible web, Steam a Seam 2 and, before you start an email to me, yes, I have tried them all and continue to experiment with new fusibles. Then I go back to S-A-S 2.

The key was finding something easier and faster than the good old pair of scissors, but, in the beginning, how to cut was just one of the problems.  The prep work it took to make the patterns  readable for the scanning machine was very tedious. I could cut with scissors faster than drawing new pieces or trying to block out the numbers and letters on the regular pattern pieces. 

The scanner is powerful and picks up the smallest line or mark.  The problem to solve was how to cut pattern pieces fast and easy. 
What if I designed the patterns so you just scan the pattern sheets into your machine and build your flower?


So that is what I did. I have no idea if you will like these or use them but they are so fun and fast and now I am addicted to the process.

The NEW Rose is the first pattern that comes with the scanning sheets OR as a regular pattern.  The YouTube class here on the blog is also for using the regular New Rose Pattern.  If want to skip ahead in the video to the flower building part of the class, at about the 35 minute mark, go for it. Please let me know if you have questions - email me at melindabuladesigns@comcast.net

For patterns and supplies got to Etsy.com/shop/MelindaBulaDesigns or click on the SHOP button on the top bar of this blog. 


Wednesday, March 17, 2021

Friday, November 27, 2020

Texas Wildflower Class Starts Today

 Class starts today. I decide to just post the whole 2 1/2 hour class here and not break it up into 2 parts. You can watch this over and over if you need to review a technique. It's been a busy Thanksgiving weekend here which I'm sure you can understand. I hope everyone had a very blessed Thanksgiving. The video is at the bottom of this post.


If you need any supply to make this quilt. I have most of them on my Etsy shop.just click the button on the bar above. My shops has Steam-A-Seam 2, scissors straight pins and other helpful items I talk about in my videos. Plus I will have thread packs that go with the Texas Wildflower kit. 
The kit includes all the fabrics to make the flowers plus the pattern booklet. 
I don't include a background fabric because this flower can go on so many fabulous background colors. the  you pick the background it make it your own.
This flower is known as the Indian Blanket flower.

If you have any questions you can contact me on my Etsy shop or message me on FB. But I would watch the whole video be for you write because I cover a lot. Enjoy! melindabuladesigns@comcast.net


Tuesday, September 29, 2020

Refresher Course's- How to work with and deal with Steam-A-Seam 2

Video's at at the bottom. So you will read the post!  

Let’s get educated. Iv spent the last month working on making some “how to "or Tips and Tricks videos on how I do my technique for making my Art. Or as some of you may call it Quilt Art or Art Quilting! Call whatever you want but I’m creating and making stuff so I call it, Art and I use my sewing machine so that quilting so we have Quilt Art!

I get asked a lot of question about how I do what I do, why I use Steam-A-Seam 2 and how to handle the sticky that comes with this product. I thought I’d answer those question by doing a few videos. They will also be posted here on my blog so you can come back anytime and watch your favorites.  They will also be on YouTube under Melinda Bula if I do all this tech-y stuff this right! 

Let’s talk about fusible webs first. There are many fusible webs on the market today. The last time I counted it was close to 20 and growing. Here what you need to Know! They are not the SAME and are used for different fusing and quilting techniques!   When your pattern or the instructor says to bring a certain kind of fusible web! Bring that fusible! That pattern and the instructors technique is based on that fusible web they are asking for. This is so important! all of us so called fusers are not doing the same thing! its like we are called Quilters but under our sewing machine we are all doing different quilting techniques. Right! Same with fusing.

 You can’t use just one fusible web for all these techniques.  Just like the threads we use today, you have to buy the right thread for the technique you are doing. We now have many choices and that may not be all good. Are you confused yet? 

In this blog and videos below, I’m just going to talk about the fusible I use. Steam-A- Seam 2. I have tried many. But come back to SAS2 for my technique. did you hear me say it. My technique.
I’m always up for something new! They are all good products. But fusing is not the same for every creative person out there. We are doing many different and unique techniques with fusible web. 
And don't get mad at your quilt shop owner. They can't afford to carry all 20+ fusible webs under the cutting tables. That is why bring yards with me to classes when I teach and sell it on my Esty shop.
Every time you see a color change its another piece of fabric.
 
Ok, what’s my technique? I am laying or overlapping layers of fused fabric on top of each other just like you lay paint on top of other paint. That’s how I make my art quilt. Iv layered up to 6 layers and still been able to sew through it.  The threads I add when quilting are another layer of color added to the composition. Steam-A-Seam 2 allow me to do that. And of course I have developed some tips and tricks I want to share with you.
And I don’t use the Lite Steam-A-Seam (Tip)  It’s dose not stay adhered. When I’m trying to quilt my piece it lifts up off the fabric.   when peeling it off the release paper half of it stay on one paper and the other half is on the other release paper. Which makes my students panic and have a bad experience!
First #1 video is about how to put the fusible web on the fabric! There are tricks that make it easy to use.

Video #2 is how to deal with all the sticky and how to clean it off all your sewing tools. That means your scissors also. Did you know there are special scissors that work better with sticky fusible web?


Hope these videos will answer some of questions? You can leave questions below or on YouTube and I will try and answer them. Remember the video is just talking about my technique and using Steam-A-Seam 2.
NOTE: no company is asking me or paying me to do this. I just have a lot of experience with this fusible and watching 1,000's of students a year using it. I figure last year I bought about 2,000 yards the sticky stuff for myself and student. 

Saturday, July 25, 2020

3 ZINNIA Quilt-Class #2

The video is at the bottom of this blog.

It is so exciting to get this NEW 3 Zinnia quilt done. I hope this class will help you through the process of making this spectacular flower quilt.

I give a lot of tips and tricks to handling 3 flowers at once that will help even if you are only making one flower.  I have put some chapter time stamps on this video so you can easily find something you want to review again or if you want to skip ahead.  

9:08  Numbering Your Petals

10:40  Layering the Centers

13:48  Arranging the Centers

20:53  Changing My Mind

24:09  Adding Layer #2

30:45  The Shadow Layer – Color D, E, F, G and H

34:00  Let's Press

36:03  Auditioning Background Fabrics

39:11  Free-Cutting Leaves

45:35  Arranging the Leaves


For the Thread Play on your Zinnia, you can watch my Zinnia Thread Play video here on this blog. You may also want to watch the Dogwood Finishing Class #5, where I show how to do the leaves and there are A LOT of leaves. These are all free.  I love to use variegated green thread on my leaves and I have some of that thread in my shop.

If you feel timid about free-motion quilting through fusible web you may want to take my online class through the American Quilt Society at iquilt.com.  My class is called Renegade Thread Play and you can watch it repeatedly. There is also a DVD by the same name at AQS.

Click Arrow in the box below to view Video

Friday, July 10, 2020

3 Zinnia: Class #1

Video Class is at the bottom of this blog.

The history of making the 3 Zinnia quilt starts several years ago with me dying fabrics for my upcoming classes at the International Quilt Festival in Houston. I had seen past students having trouble with color and values and I thought that if I could make kits, they would all be successful and that is all a good instructor wants -  for their students to be successful.  So I became a dyeing machine. Morning, noon, and night, I was in the dying studio (the garage) working on perfecting my colors.  It was a lot of hard work but it paid off.  Then, fear set in and I panicked - what if these colors suck together. I decided I'd better make some flowers and be sure the colors worked together. 100 of yards of fabric were already dyed, so I spent the remaining days before I left to teach this class making the 3 Zinnia quilt. Thank God it all worked out. That was back in 2005 and I kept it up for a few years but I had to stop dying because I couldn't keep up with the demand and still have a life. Luckily, I found that Hoffman of California has a Watercolor collection that looks just like my hand-dye fabrics.  Okay, maybe better.


Now, everyone wants to make the 3 Zinnia and asks me when will I have a pattern for that? Good news, I already have the pattern for it. It's all the same flower - I just changed their colors and laid them facing different ways on the background fabric. One pattern, 3 colors, and one big 44” x 44” piece of background fabric.

This class is about how to make the 3 Zinnia using one pattern in 3 different colorways. I’m not showing you how to fuse - you can go to  (How I use Steam A Seam 2) or how to quilt - you can go to (Dogwood finishing class #5, Renegade Thread Play or iQuilt.com ) for all that. I will be showing  you how to make 3 zinnias at once using one pattern. 

If you have taken this class with me in the past and can find your pattern (and maybe an unfinished flower),  this video will help you complete that project and make even more flowers, if you want. If you need more fabrics in other colorways to turn that single flower into a 3 Zinnia, I have fabric packs on my Etsy shop - look for Just Zinnia Fabric Packs - there are 4 colorways available.


If you want to take the 3 Zinnia class and don’t have the pattern, go to Etsy - the link is up above on the bar.  You can purchase the Zinnia Kit in the color of flower you like, then go to Just Zinnia Fabric Packs and pick 2 more colorways.  Now you will have a custom quilt with your favorite zinnia colors made from beautiful Hoffman batik fabrics, selected for these flowers based on my hand-dyed fabrics. 

Below are the colors I am using in the video - orange, berry and yellow.


Click on the arrow below to start the class.

Enjoy!


Saturday, June 27, 2020

Zinnias on Parade


What is a Saturday without a new video post from me?  I made a new video called Zinnias on Parade - these are pictures from classes I've taught all over the country and at big shows. I thought you might like to see students' progress in a one day, 6-hour class.  These beauties are in different stages of development and some of the fabrics used for these flowers were made from my hand-dyed fabrics (made in my garage) from back in the day.  Some are the student’s own fabrics, too, and they are all beautiful no matter what fabric they used.  One of my favorite zinnias in the video is the green one made by my friend, Pam Hough.  I hadn't met her until this class and when she walked in with these green fabrics, I squealed with joy.  I think I scared her at first but that's how I roll.

Now here is the reason for this blog. There are a lot of these zinnia flowers out there in the world and some of you have not finished yours.  Don't worry, I'm not going to name names. I would just like to help you finish them since we are still in lock-down.  OK, is it just me that’s still in lock-down?  You never know these days.  Anyways, lets finishes these zinnia quilts. 

Click the arrow to watch the video.

Now here is the surprise. I am making a new video class about how to make a 3 Zinnia Quilt out of one pattern in 3 different colorways.


 I will show you how to free-cut the leaves, what size fabric to use, and how to 
not get confused while making 3 flowers at once.  I have a few tricks for making these flowers quicker and easier than you think.  Plus, we will talk about quilting your flower.  So, check out the video here on this blog to get you excited.  If you subscribe to my YouTube channel you will get a notification each time I post a new how-to video.  Oh, and did I say this is free?


Saturday, June 13, 2020

Dogwood class #4 “Renegade Thread Play “


I have been excited to make this video and show you how to finish your Dogwood quilt or any other patterns you may have started in one of my classes and longed to finish.  I have taught a lot of classes over the years and I know there are a lot of you wanting to finish your quilts. That is why I am doing these videos. I know some have criticized, "she is giving these away for free".  I have had a great career and taught all over the country and internationally. 

I've met a lot of wonderful people and they have bought my patterns and want to finish their flower quilts. Now is the perfect time to finish that quilt since we are stuck at home. So why not do a tutorial to help students finish their quilts.  It’s sad we can’t get together, take a class or go to a quilt show. But we can still learn and finish those UFO's.

The Dogwood videos has a lot of techniques that will be use in most, if not all my patterns. I can’t make you a pro over night, but I can push you a little and give you some tricks to make you successful. Just remember, this is just fabric, we can always get more. No one is critical of your efforts, but you.  So, stop it.  Life is too short.

Click on this box below to view Video

Supply I use for this Renegade Thread Play class.

Sulky 40-weight Rayon thread in an assortment of colors. Look at the fabric colors you use for your flower. The lightest values and the darkest values.

Sewers Aid-important

Thread snip- I like Karen Kay Buckley’s snip 

Lots of bobbins- if we use 15 threads you need 15 bobbins      

Quilters Dream Batting 100% cotton- Request        

Medium safety pins       

Top Stitch or Jeans Denim needles size, 80/12 or 90/14 - important     

 Supreme Slider

Some of these supplies you can find on my Esty Shop. The link is on the gray bar above.


Saturday, May 16, 2020

Dogwood Class #2 Fusing, Layering and Backgrounds


I am SO glad you joined me for Dogwood Class #2. This video is going to cover a lot and is 45 minutes with resting spots along the way.  In this video, I will cover:   

  • How to fuse large pieces of fabric (like color A in this pattern)  
  • Which pieces to cut out first   
  • How the layout guide works     
  • Adding the lining pieces to color A     
  • How to use parchment paper sheets       
  • Working with the first layer
  • How to choose a background fabric


There is homework for next week, which is to fuse and cut out all your fabric pieces. I discovered a new way to organize all those cut pieces, which I like better than putting pieces in a little baggie. I saw the idea on the Fat Quarter Shop.  Designer Lori Holt made these little design boards covered in batting that hold your appliques while you are working on them.  I also found that they hold my cut fused pieces until I am ready to use them and I can stack them on top of each other so they take up less space while I'm working.

At the Fat Quarter Shop, they have a video on how to make these out of foam core board. I did not have foam core, but I did have lots of cardboard boxes.  


I cut my firm cardboard, my batting, and one piece of fabric all 12” x 12”.  Then I put Steam-A-Seam 2 on the back of the batting and the back of the fabric.  Next, I ironed them, peeled off the release paper, and put the sticky side of the batting on one side of the cardboard and the fabric on the other side and ironed them onto the cardboard.  I then made 2 ¼ inch binding and hot glued it around the edges of the exposed cardboard.  Or you can just buy one pre-made for $12 from the Fat Quarter Shop - they come is all sizes and colors.

I organized the boards by letter - 3 letters (colors) to a board. I put all my red hearts on one board and put that board on the top of the stack. This is going to help me find pieces when we do next week’s class.


Next week,  class #3, we will finish laying all the Dogwood flower pieces down and get it ready for Renegade Thread Play in week #4. 

I hope you are having fun doing this project.  If you have any questions, you can email me at melindabuladesigns@comcast.net or leave a comment below.

If you need supplies, kits, or patterns, you can find them at my Etsy shop - click on the link above this post on the gray bar.