I turned my red poinsettia quilt into a white poinsettia about 2 years ago, I love the red, but it is too intense for my all-blue house and Christmas tree. But the white is perfect. The problem is, where did I put that darn quilt? So the hunting began, and when I found it, it was a wrinkled mess with pieces falling off, the Steam-A-Seam was hard and crunchy. yuck! Has this ever happened to you?
Well, all is not lost, and in this video, I show how I fixed this quilt. Steam-A-Seam2 loves steam.
As I was working on repairing the fusible flower, I had an idea! My granddaughter, who is 4, says this all the time," I have idea." We squeal with excitement because she has an idea. Well, so did Mimi and nobody squealed but me. You can always add to your flower quilt. try adding another flower or a decorative design to the background. I did a polka dot background on one quilt. These elements make it yours and add a lot. But they have to be added before you start to quilt.
So who cares if the quilt is 3-5 years old and you haven't finished it yet? Get out your iron and steam. You can always say you were waiting for an Idea!
It is so important to have yet so hard to figure out the perfect studio space. I started quilting professionally in 2005, and my sewing/studio room was 11' X 11'. Surprisingly, I made my first 3 award-winning quilts in that space. That same house was locally notorious as The Yellow House in our town of El Dorado Hills. Later, when Matt went to college, I took over the bonus room above the three-car garage, about 550 square feet with 2 design walls and a trundle bed for guests. Even though the space was big I still had to organize the space wisely, but it was a dream space. We lived there for over 20 years. I used that space for about 14 of the 20 years.
The Yellow House studio
The next studio was in our Paradise house. It was a vaulted-ceiling loft room, again above our 3-car garage with no straight walls - they all vaulted after 4 feet. It was going to be tricky to decide where to put the design wall BUT this space had views from every window AND perfect light. I started out designing the space to get maximum use out of the area. Sadly, I never got to implement that design because 13 months after we moved in, on November 11, 2018, the Camp Fire destroyed 95% of the town of Paradise, including our home.
View from the Paradise studio
For the last 3 years, I haven't had time to think about the luxury of studio space, I needed a house and everything that goes into running one - stuff like beds, pots, and pans. I have been very busy buying stuff, which you would think would be so much fun. It is not. I'm buying utilitarian items like paper clips, soap dispensers, and extension cords. All the little things I used to take for granted. but every once in a while, I threw in a fabric pack and dreamed of my next quilt - the one I could start when I got done buying picture wire and screwdrivers.
When we first moved into the new Bakersfield house
Now to the new space in this new house that we call my studio. I started with just the basics. A folding table and chair. I was getting over the loss of my house and all my belongings, and I was very scared to make a new space. It was a fear of losing it all again. That fear can paralyze you if you let it. I soon learned this is not what God wants for my life, so we are moving on. What a gift it is to be able to have a room just for creating and making things. Then to be able to call it MY studio. I realized I'm living the dream that I had as a little girl. - don't let a fire take your light.
I have spent hours looking at Facebook, Instagram, and Pinterest for studio inspirations. Most of the rooms are designed stylishly with wallpaper and painted in beautiful colors like no one has ever worked on a project in that room, EVER. We all know those images are not true studios. So, I read most of the studio design books by quilters and even non-quilters. Well, really, I mostly looked at the pictures. They were all saying, when it comes down to it, you need to start with a measuring tape, ruler, pencil, and graph paper, and consider what the purpose of the space is right now.
New studio layout
My new space is 16 ' x 18'. Not that big for a pattern design business and an art studio. Yes, I am also taking over another adjoining room, but I am very happy with how this is working out. Plus, because of the fire, I have pared down, a lot! Maybe a little too much.
And now I can shop for just me, which is fun. Joe made a comment the other day about how I get all the deliveries. So, I let him have one that had just arrived - it was our new broom and mop. See, I'm a giver.Here are some fun pictures of what I/we have done so far in the studio and some cool storage finds I wanted to share with you. And, like all wonderful things, your studio design is always in the process of development. New tools, and new ideas, can change the shape of your space over time. Who knows, I might find a great wallpaper out there that I can't live without. You do not want to see Joe's face when I ask him to help me move those bookcases again. studio supplies I purchased on Amazon. https://www.amazon.com/hz/wishlist/ls/1KRR3GJIU2T9J?ref_=wl_share
I’m writing this blog because I know many new-be quilters
out there may need some guidance when choosing fabrics for a specific project.
Specifically, one of my flower patterns or a landscaped, something that you
want to give a realist/painterly look. It matters what kind of fabric you use.
I’m going to speak specifically about my technique and using my flower
patterns, but the concept works across the board. You can’t use any
run-of-the-mill quilters stash for making these art quilts. So, what is my technique? I’m painting a painting using use fabrics. So, when you buy my patterns, you are to?
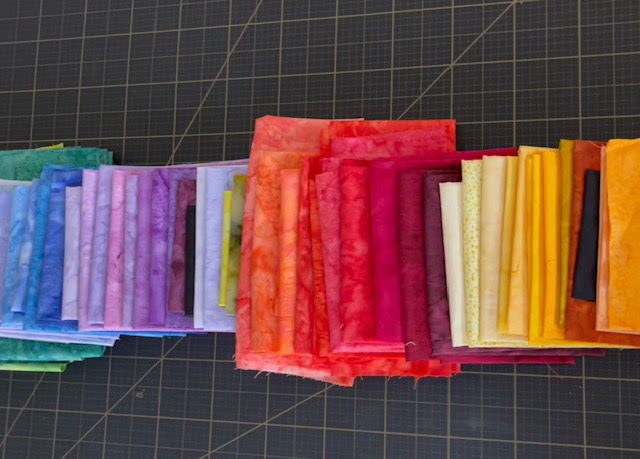
Batik fabrics were designed back in the day (thank you,
Hoffman, of California); I had the idea of using them like paint because they
had this watercolor feel, and I thought they would look like a painting. It is
dyed in such a way to give a multi-colored and value feel like you look like it
was painted, and they did, and they still do. Most realistic quilt artists use
batiks and hand-dyed textures, even tone-on tones, to get that look.
First DON’T. Don’t use solid fabrics when you want a painterly look in your
flower quilts. It doesn’t work. It gives a very flat look with no dimension.
Now, if that’s what you want? Go for it. But my patterns were designed, and the
pieces are layered to give a watercolor look by using the right kind of fabrics
with fabrics. We want the viewer to come up close and say,” did they paint
that?”
Now for all the solid fabric designers out there, I love
your fabrics and the colors. I buy them. They are beautiful. But not for making
my realistic flower or landscape quilt.
Use the color chart in the pattern as a color and value
reference. Look at how the colors relate to each other.” Is this one darker or
lighter than the one on top?
Do you have value in your fabrics? The range of lights to
darks is so essential. Remember, dark colors reseed, and light colors come
towards you, just like painting a still life. And my flower patterns are a
“still life.” The value rules change when doing landscapes. We will talk about
that at another time.
Don’t skip making the color chart in every pattern. The
pattern instructed you to make the color chart in your chosen colors first.
Please do it! It’s a visual reference guide to help as you build your flower.
Very important.
I hope this helps you when making your flower quilts. I have
been working on turning some of my patterns into digital downloads, but I worry
you will use the wrong fabrics.
I use batiks and hand-dyed fabrics to make my quits look
like a painting without using paint. This is my secret for achieving that look.
When I had a student
bring their own fabrics to class, only 1% understood what to bring to class. But
99% of the students brought the wrong fabrics and went home unsuccessful. Not
good. When I started making kits for the classes, all were successful, and
learned how to make a flower look real by using the right fabrics. They
discovered that fabric is now a painting tool.
Check out my video above for more fabric information.
Remember being a quilter require us to have many kinds of
fabrics.
I'm excited to announce that I will be teaching at Empty Spools next year. I have had a lot of inquiries for classes and retreats, so here is your chance. I'm taking this year off from traveling and teaching except for a few local quilt guilds because of COVID and family and personal health issues. So, if you're looking for classes from me, you will have to wait until 2023 (unless you're a member of one of this year's guilds). I do have some YouTube classes, but in-person is so much better.
Waratah: Commercial fabrics, batiks, and hand-dyes .
If you don't know about Empty Spools Seminars, they are 5-day quilt art retreats. They are held at Asilomar Confrence Center, an historical retreat in beautiful Pacific Grove, California, which is on the Central Coast between Monterey and Carmel. You spend the week with one noted quilt instructor and focus on that instructor's technique. I'm teaching session 5, from May 5-10, 2023 and they are taking sign-ups now. Click the link.
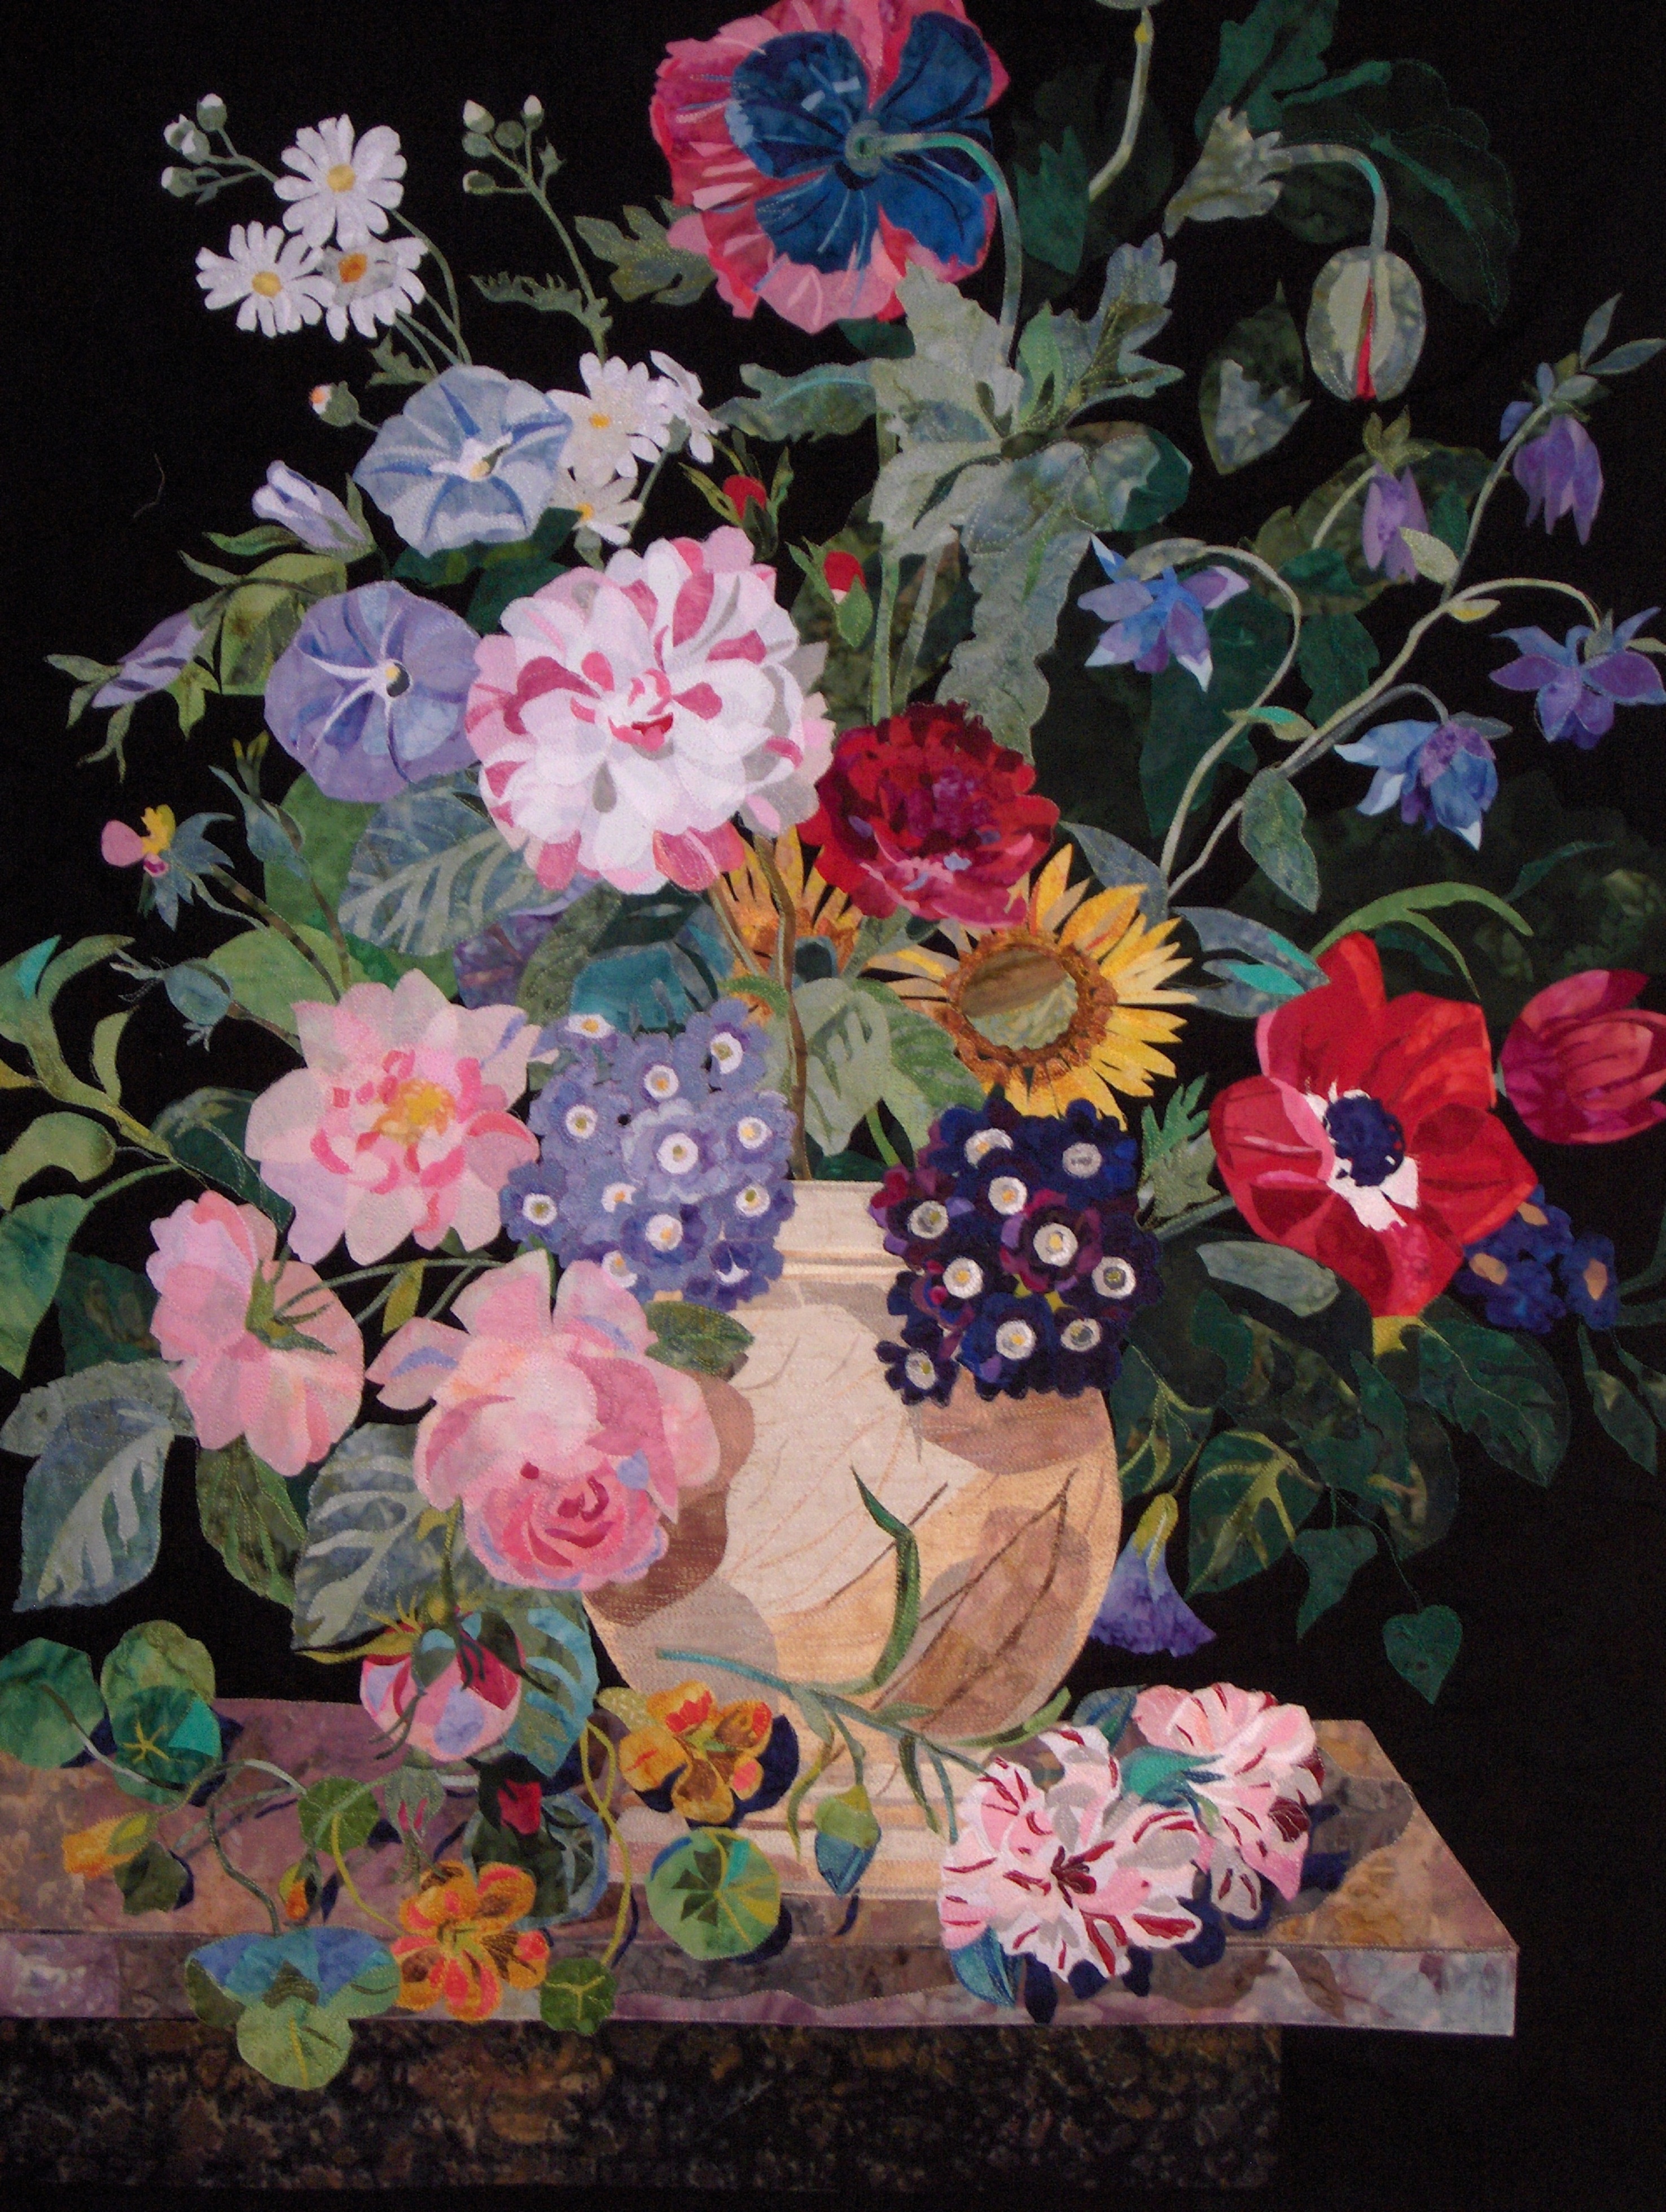
A Gardens Delight: Commercial fabrics and batiks
All my quilts here are made with only fabric, and no paint. Back in the early years of my art quilting, it was important to me to just use fabrics, and most of them were commercially available. I then started using batiks and my own hand-dyes, which I still use.
...and Our Flag Was Still There: Hand-dyes and batiks
3-years ago we experienced a devastating fire in Paradise, California, which killed 85 people. The Camp Fire wiped out 95% of Paradise, destroyed 14,000 homes and displaced 27,000 people, many of whom lost not only their home, but their business, as well. I lost everything, including dozens of quilts and 20 years of accumulated fabric stash, along with a studio full of every tool, supply and sewing machine a quilter could ever want.
Camellia: Photo above and quilt below - hand-dyed and batik fabrics
I started to rebuild my stash and then COVID-19 hit and shops closed down. Not having a fabric stash has changed how I work, think,and create. So, last week, I broke down and started using paints. I know! I'm working on a hydrangea quilt (my second try) and I just don't have the fabric stash to make it work. I will be posting my progress on the hydrangea and, so far, it is coming along nicely thanks to the paint. And yes, it is easier with paint and I am learning a new technique to implement with my old technique. So sign up for my Empty Spools Seminar workshop and I will be sending you a new supply list that will go along with the one on the retreat website. You can email me when any questions and I will share with you all my tips, tricks, and insights for using fabric, fusible web, and paint. You can reach me at melbula@comcast.net.
Today is the day! After 5 years of researching and playing around and a lot of trial and error, I have figured out how to use my cutting machine to cut out one of my patterns. Big deal, you say. Well, if you have ever taken a class with me, you know there is a lot of cutting with scissors around sometimes very tiny pieces to make one of my flower quilts. I love to cut but I also love to make flowers fast.
Over the years at quilt festivals, I have watched many demonstrations at the Brother booth on how to use their cutting machines but I just could not figure it out, until my house burnt down and COVID-19 hit and I finally had time to focus. So, I bought the machine with the intention of scrapbooking but started experimenting with fabrics in the machine right away. Oh, the messes I made.
Bad cutting!
Good cutting
Yes, you could always use your cutting machine before with fabrics
but not with Steam A Seam 2. All my art quilts and patterns are made using my preferred fusible web, Steam a Seam 2 and, before you start an email
to me, yes, I have tried them all and continue to experiment with new fusibles. Then
I go back to S-A-S 2.
The key was finding something easier and faster than the good old pair of scissors, but, in the beginning, how to cut was just one of the problems. The prep work it took to make the patterns readable for the scanning machine was very tedious. I could cut with scissors faster than drawing new pieces or trying to block out the numbers and letters on the regular pattern pieces.
The scanner is powerful and picks up the smallest line or mark. The problem to solve was how to cut pattern pieces fast and easy.
What if I designed the patterns so you just scan the pattern sheets into your machine and build your flower?
So that is what I did. I have no idea if you will like these or use them but they are so fun and fast and now I am addicted to the process.
The NEW Rose is the first pattern that comes with the scanning sheets OR as a regular pattern. The YouTube class here on the blog is also for using the regular New Rose Pattern. If want to skip ahead in the video to the flower building part of the class, at about the 35 minute mark, go for it. Please let me know if you have questions - email me at melindabuladesigns@comcast.net
For patterns and supplies got to Etsy.com/shop/MelindaBulaDesigns or click on the SHOP button on the top bar of this blog.
The Keys to successful Renegade Thread Play are to have a
few of the right tools and follow your cut fused piece on each petal. All the
work you did of cutting out those little strips and wedges or vines in the
petals are your hit lines for how to curve your thread when quilting.
1.Do not go fast. Medium fast is great.
2.Having something on you hand is a must for better control. Aka, Gloves. It
really makes for better stitches.
3.Having the right needle for the job. What is the Job? Trying to quilt through thick
fusible web while making beautiful line drawings with thread and coloring at the same
time.
You need a big hole in the eye of the needle and a needle that is designed to go through thick fabric like fusible. Topstitch needle size 80/12 or 90/14, or a Jeans
Denim needle size 80/12 or 90/14. I start out with the 80/12, but if you
have skipped stitches try the 90/14.
4.Heat is your friend when sewing through Steam-A-Seam 2. Warm up the area that you are about to quilt
with your hot DRY iron. Steam will make your quilt wet. You can't quilt through a wet quilt. The heat melts and softens the fusible web. This makes its easy to sew through.
This only works with Steam A Seam 2. That is why I use it. You can iron it over and over. Not all fusible can take over ironing.
5.Lower your top thread tension. I wish I could give you a
magical number, but every sewing machine has its own number, and that number can
change from day to day. Depending on howmoody your machine is. The manufactures
number for regular domestic sewing is around 4, 5. But when doing free motion
quilting you are pulling and tugging on the fabric under the needle which means you need the tension to be looser than normal. You
need to have the tension at a lower number like 3, 2, or 1. I move the number down
a little at a time, always looking at the front and back of my stitches, to see
if I have equal tension on both sides.
6.I am using Rayon thread to do Renegade Thread Play. I love this
thread because of it shine and comes in vibrant colors. Rayon is very delicate and can break or
fray very easily if you do not know how to handle it. I coat every spool of rayon thread before I thread my machine and after I wind my bobbin with Sewers Aid. Its a lubricate that keeps the thread from being nicked or frayed while moving through the sewing machine and needle. I squeeze 3 to 4 lines of sewers aid a crossed the spool, length wise and squish it in.
The short video below will show you how I use Sewers Aid to helps with sticky build up on my needle.
To watch VIDEO - Click in the middle to play.
More videos are on my YouTube Channel-Melinda Bula Designs
It's mind-blowing to me how many businesses have been severely affected by the COVID-19 pandemic and those of us in the quilting, sewing, and fabric industries have not escaped the pain. Fortunately, the quilting business is made up of creative minds and that ingenuity, along with some tricky tap
dancing, has kept most folks upright and moving forward. I don’t know
about you, but when I'm given a challenge, and I've faced several big ones in my life, I need to overcome and conquer. That does not mean I don’t have a
good cry or get really mad - I do. But I eventually put the self-pity aside and find a creative solution to move forward.
My creative solution was to make some How To tutorial videos of a few of my patterns, like a recorded class, then post them to my
YouTube channel. I was pleased (and a little surprised) to see how many quilters watched them, proving that even in this crazy time, you still love to be creative, too. Sales through my Etsy shop have been a genuinely nice surprise.
THANK YOU. I love making videos - everything about it, from editing to lighting to adding graphics, even picking
the right music, I love it all. It is just the spelling I have trouble with but thank God I married a great speller.
I also love to design NEW patterns for you to
make and enjoy the creative process so, when I was asked by international quilting icon American
Quilters Society to be part of a new project using a new pattern I designed, I jumped at the chance. It's called QuiltCLASS@Home and my new teaching video will be part of their lineup. So, while we wait for the traditional venues to come back, and they
will, we can continue to support the teachers, designers, and industry we all love by
taking classes and visiting quilt shows online. I think it’s a great idea.
For information about my NEW class with AQS and to sign up, click HERE. The class will be through a private Facebook group.
Then order your pattern from my Etsy Shop.
You can get a complete pattern and fabric kit or you can get a downloadable
version of the same pattern and use your own fabrics. The downloadable pattern
also has a color chart to help you find the right colors from your own stash.
In the class I demonstrate how I used Ombre
batik fabrics in this quilt - the process is incredibly fun.
The Ombre fabrics I use (and sell) are from Hoffman of Californian and Robert Kauffman. The complete
kit, pattern and fabrics is $75. Background fabric is included.
Digital pattern is
$12 - use a color printer when printing - all pages are letter size.
Traditional pattern through my shop is $20.
Hope this helps.
If you have any questions, please email me at melindabuladesigns@comcast.net.
Class starts today. I decide to just post the whole 2 1/2 hour class here and not break it up into 2 parts. You can watch this over and over if you need to review a technique. It's been a busy Thanksgiving weekend here which I'm sure you can understand. I hope everyone had a very blessed Thanksgiving. The video is at the bottom of this post.
If you need any supply to make this quilt. I have most of them on my Etsy shop.just click the button on the bar above. My shops has Steam-A-Seam 2, scissors straight pins and other helpful items I talk about in my videos. Plus I will have thread packs that go with the Texas Wildflower kit.
The kit includes all the fabrics to make the flowers plus the pattern booklet.
I don't include a background fabric because this flower can go on so many fabulous background colors. the you pick the background it make it your own.
This flower is known as the Indian Blanket flower.
If you have any questions you can contact me on my Etsy shop or message me on FB. But I would watch the whole video be for you write because I cover a lot. Enjoy! melindabuladesigns@comcast.net
New class is coming Saturday November 28. That just means that I will post the class on that date but you can watch it any time you want. You can always watch my classes here on my blog or on my YouTube channel. This is a free class about 2 1/2 hours long. I have broken it up into 2 parts, the second part will post on Saturday Dec 5, and covers how to thread play this quilt.
I thought you may want to know the history of this quilt. It was originally made for an auction that The Quilt Show had to raise money for a special quilter Libby Lehman who had a stroke plus other complication. If you don't know who Libby is you need to google her. She is a true Quilt Star. And helped paved the way for many quilters including myself.
The below video is my process of making the auction quilt back in 2014. I hand dyed most of the fabric for this quilt. After I watch video I wish I had some more of that background fabric. I love that print.
Later when making this pattern I had to simplified the number of fabrics in the quilt. I originally had 60 different colors of fabrics, which is not good for a pattern for the public. Now it has 20 and you can always add more.
I also found this beautiful song by Oran. It's call Every Flower. So appropriate don't you think?
If you would like to make this quilt you can find all the supplies on my Etsy shop. There is a Shop Botton above on the tab bar. I have patterns, kits that included fabrics and the pattern, yards of Steam-A-Seam 2 which is the fusible web I use and thread packs for the Texas Wildflower.
I hope you get inspired by this video and want to make your own Wildflower Quilt. You don't have to use Texas in the name. If you are from Illinois you can call it the Illinois Wildflower. It's all ok with me. But Libby is a Texan and I'm a Californian and we can all be wildflowers. Hope to see you back here for class on Saturday Nov 28.
Video's at at the bottom. So you will read the post!
Let’s get educated. Iv spent the last month working on making some “how to "or Tips and Tricks videos on how I do my technique for making my Art. Or as some of you may call it Quilt Art or Art Quilting! Call whatever you want but I’m creating and making stuff so I call it, Art and I use my sewing machine so that quilting so we have Quilt Art!
I get asked a lot of question about how I do what I do, why I use Steam-A-Seam 2 and how to handle the sticky that comes with this product. I thought I’d answer those question by doing a few videos. They will also be posted here on my blog so you can come back anytime and watch your favorites.They will also be on YouTube under Melinda Bula if I do all this tech-y stuff this right!
Let’s talk about fusible webs first. There are many fusible webs on the market today. The last time I counted it was close to 20 and growing. Here what you need to Know!They are not the SAME and are used for different fusing and quilting techniques! When your pattern or the instructor says to bring a certain kind of fusible web! Bring that fusible! That pattern and the instructors technique is based on that fusible web they are asking for. This is so important! all of us so called fusersare notdoing the same thing! its like we are called Quilters but under our sewing machine we are all doing different quilting techniques. Right! Same with fusing.
You can’t use just one fusible web for all these techniques. Just like the threads we use today, you have to buy the right thread for the technique you are doing. We now have many choices and that may not be all good. Are you confused yet?
In this blog and videos below, I’m just going to talk about the fusible I use. Steam-A- Seam 2. I have tried many. But come back to SAS2 for my technique. did you hear me say it. My technique.
I’m always up for something new! They are all good products. But fusing is not the same for every creative person out there. We are doing many different and unique techniques with fusible web.
And don't get mad at your quilt shop owner. They can't afford to carry all 20+ fusible webs under the cutting tables. That is why bring yards with me to classes when I teach and sell it on my Esty shop.

Every time you see a color change its another piece of fabric.
Ok, what’s my technique? I am laying or overlapping layers of fused fabric on top of each other just like you lay paint on top of other paint. That’s how I make my art quilt. Iv layered up to 6 layers and still been able to sew through it. The threads I add when quilting are another layer of color added to the composition. Steam-A-Seam 2 allow me to do that. And of course I have developed some tips and tricks I want to share with you.
And I don’t use the Lite Steam-A-Seam (Tip)It’s dose not stay adhered. When I’m trying to quilt my piece it lifts up off the fabric. when peeling it off the release paper half of it stay on one paper and the other half is on the other release paper. Which makes my students panic and have a bad experience!
First #1 video is about how to put the fusible web on the fabric! There are tricks that make it easy to use.
Video #2 is how to deal with all the sticky and how to clean it off all your sewing tools. That means your scissors also. Did you know there are special scissors that work better with sticky fusible web?
Hope these videos will answer some of questions? You can leave questions below or on YouTubeand I will try and answer them. Remember the video is just talking about my technique and using Steam-A-Seam 2.
NOTE: no company is asking me or paying me to do this. I just have a lot of experience with this fusible and watching 1,000's of students a year using it. I figure last year I bought about 2,000 yards the sticky stuff for myself and student.
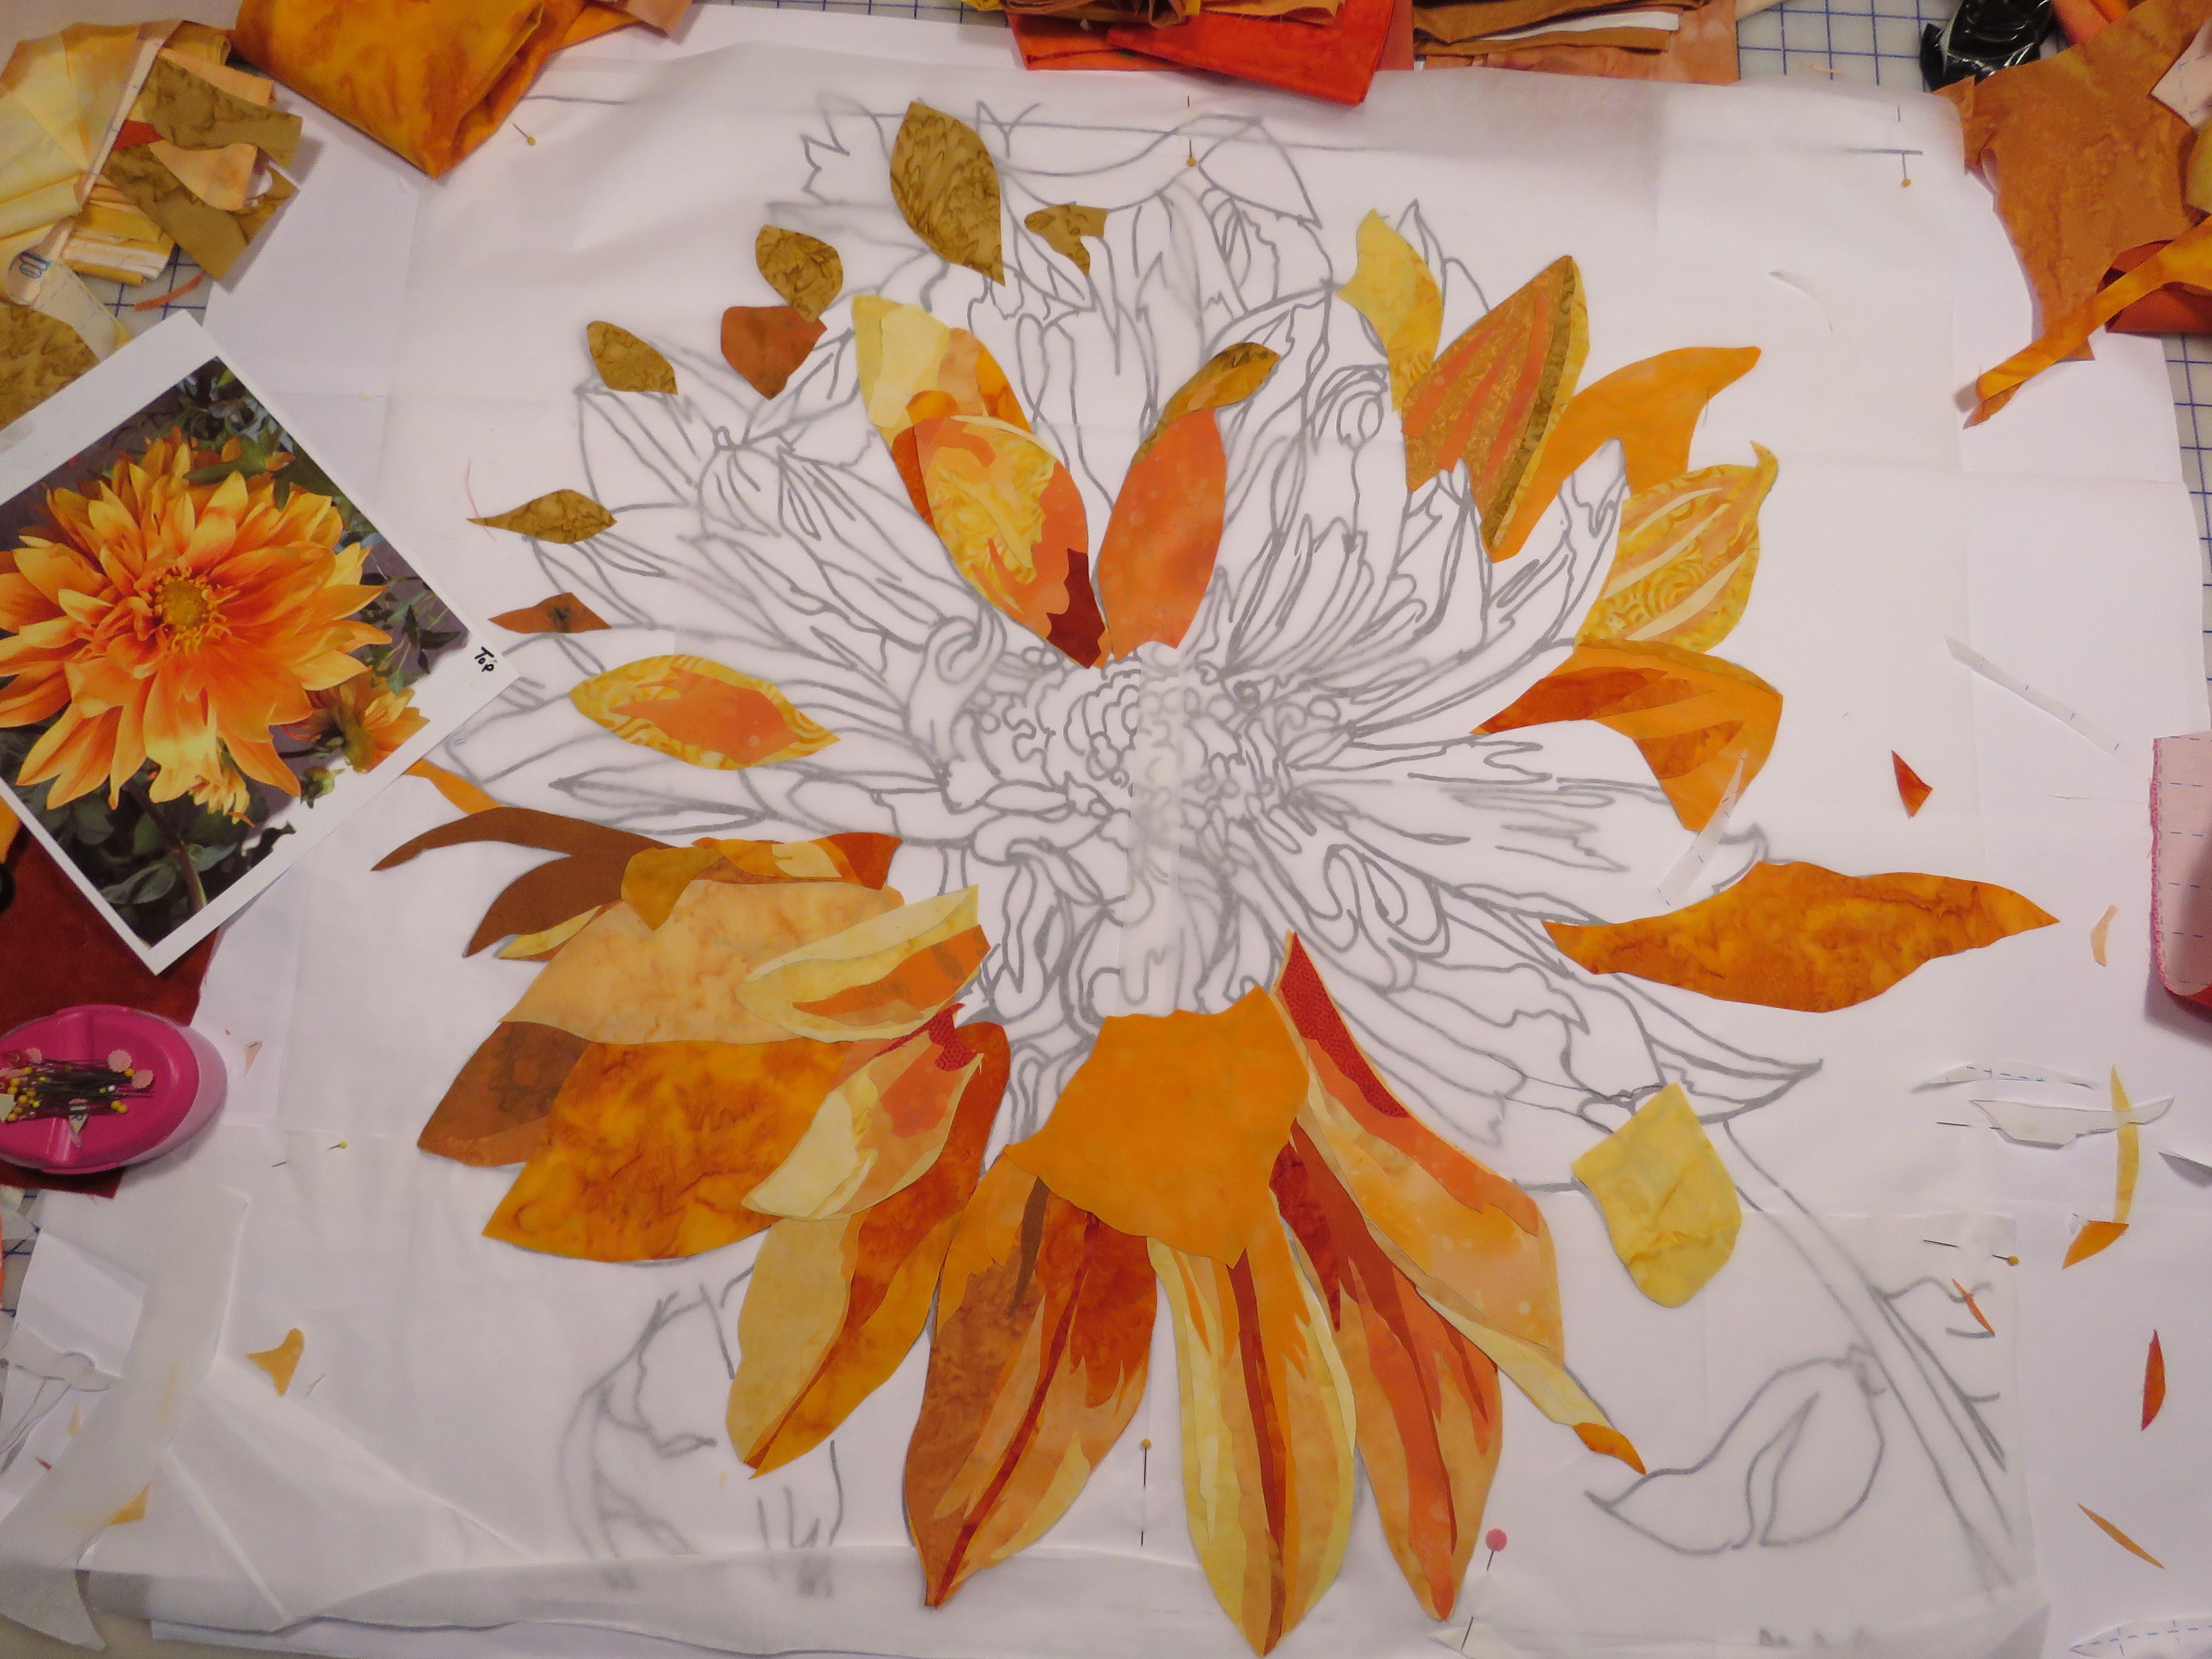
I
am not sure if this is an orange or yellow dahlia. But oh, I love them so much.
There are some beautiful dahlias on show at certain times of the year at the
Fort Bragg Botanical Gardens. I was in heaven. This is one of the pictures I
took and started when I got home. Could not wait to make it into an art quilt.
I did a video of the process of making this flower. I am also showing you the
steps I take to make my art quilts. I also was using my Color Finder tool I
invented for my students when I do a week long retreat. It helps them find the
right value and color in their photo. I have a retreat coming up in February
21-26, 2021. I so hope we get to go. It is withEmpty Spools Seminarsin beautiful Pacific Grove, California. I love being there
and teaching students that have never done art quilts on how to do it. Or
encourage the creative person that just needs a gentle push with a few tips and
tricks thrown in for good measure. Check out their web site if you are
interested.
But the sad thing is I did not get to finish this beautiful flower quilt. I got busy teaching and traveling. Then we moved but I was still longing to get back to it right a way. Then we had this fire……
You guess it. Its gone. But I still have the photo and my love for this picture and the colors has now intensified. And now I have time. So, this is a video of how I do my flower art quilts. I call them paintings with out using any paint. All my quilts are made with just fabric and then thread. There is no paint. I hope you enjoy.
Oh, and I love this song. But is it yellow or orange? let me know.
It is so exciting to get this NEW 3 Zinnia quilt done. I hope
this class will help you through the process of making this spectacular
flower quilt.
I give a lot of tips and tricks to handling 3 flowers at
once that will help even if you are only making one flower. I have put some
chapter time stamps on this video so you can easily find something you want to review
again or if you want to skip ahead.
9:08 Numbering Your Petals
10:40 Layering the Centers
13:48 Arranging the Centers
20:53 Changing My Mind
24:09 Adding Layer #2
30:45 The Shadow Layer – Color D, E, F, G and H
34:00 Let's Press
36:03 Auditioning Background Fabrics
39:11 Free-Cutting Leaves
45:35 Arranging the Leaves
For the Thread Play on your Zinnia, you can watch my Zinnia Thread Play video here on this blog. You may also want to watch the Dogwood Finishing Class
#5, where I show how to do the leaves and there are A LOT of leaves. These
are all free. I love to use variegated green
thread on my leaves and I have some of that thread in my shop.
If you feel timid about free-motion quilting through fusible web you may want to take my online class through the American Quilt Society at iquilt.com. My class is called Renegade Thread Play and you can watch it repeatedly. There is also a DVD by the same name at AQS.
The history of making the 3 Zinnia quilt starts several years ago with me dying fabrics for my upcoming classes at the International
Quilt Festival in Houston. I had seen past students having trouble with color and values and I thought that if I
could make kits, they would all be successful and that is all a good instructor wants - for their students to be successful. So I became
a dyeing machine. Morning, noon, and night, I was in the dying studio (the garage) working on perfecting my colors. It was a
lot of hard work but it paid off. Then, fear set in and I panicked - what if these colors suck together.
I decided I'd better make some flowers and be sure the colors worked together. 100 of yards of fabric were already dyed, so I spent the remaining days before I left to teach this class making the 3 Zinnia quilt. Thank
God it all worked out. That was back in 2005 and I kept it up for a few years but I had to stop dying because I couldn't keep up with the demand and still have a life. Luckily, I found that Hoffman of
California has a Watercolor collection that looks just like my hand-dye fabrics. Okay, maybe better.
Now, everyone wants to make the 3 Zinnia and asks me when will I have a pattern for that? Good news, I already have the pattern for it. It's all the
same flower - I just changed their colors and laid them facing different ways on
the background fabric. One pattern, 3 colors, and one big 44” x 44” piece of
background fabric.
This class is about
how to make the 3 Zinnia using one pattern in 3 different colorways. I’m not
showing you how to fuse - you can go to (How I use Steam A Seam 2) or how to quilt - you can go to (Dogwood finishing class #5, Renegade Thread Play or iQuilt.com ) for all that. I will be showing you how to make 3 zinnias at once using one pattern.
If you have taken this class with me in the past and can find your pattern (and maybe an unfinished flower), this video will help you
complete that project and make even more flowers, if you want. If you need more fabrics in other
colorways to turn that single flower into a 3 Zinnia, I have fabric packs on my Etsy shop - look forJust Zinnia Fabric Packs - there are
4 colorways available.
If you want to take the 3 Zinnia class and don’t
have the pattern, go to Etsy - the link is up above on the bar. You can purchase theZinnia Kitin the color of
flower you like, then go toJust Zinnia Fabric Packs and pick 2 more colorways. Now you will have a custom quilt with your
favorite zinnia colors made from beautiful Hoffman batik fabrics, selected for
these flowers based on my hand-dyed fabrics.
Below are the colors I am using in the video - orange, berry and yellow.


.jpg)

.jpg)


