Thursday, November 29, 2012

Ice-Dyed Fruit Loop


As this year winds down I find that I still have creative obligations knocking on my studio door.  Houston International Quilt Festival is over for 2012 but planning for 2013 is already in the works plus I was just asked to be part of the faculty for a fantastic 2014 Panama Canal Cruise that Deb Roberts Tours and Road to California are planning.  This is going to be a big event. 

So we need some new patterns for that cruise.  Oh, I forgot to tell you that all these proposals have to be in by December 5th. 

So, for the last couple of weeks I have been working out the bugs on some new pattern ideas.  Not all my ideas have worked out and I thought you might like to see how it has been going.


This may not look like anything but a yellow blob but I have always wanted to do an orchid. Orchids grow all over the tropics - perfect for the Panama Cruise!  By day 3 my husband, who now works out of the house alongside me, decided to take one of his 3-4 "breaks"  during the day to visit my studio and inform me that maybe this orchid might be a little too hard for a cruise.  Remember the gals on the last cruise?  They didn't  want anything too challenging, they just wanted to have fun.

 To be finished on another day..
OK, he was right. This may be better for another day.  Back to the drawing board. 
Then I found the perfect tropical subject matter and it's not a flower.  How about my favorite bird, the toucan? 
He is so cute and has such personalty and I made him in 2 hours.  Now this is more like it.  I started adding leave to the background using my ice-dyed green fabrics.   It gives the leaves a  watercolor look without having to use a lot of different fabrics, which is great for the cruise because the cruisers don't want to bring that much stash with them.  I will have the ice-dyed greens in their kits. 
Finally, he is done.  Next is the stitching, which will have to be done at home but the pattern will have details for how to quilt this cute little guy.  I think he needs a name...how about Fruit Loop?
He looks hard to make but he's really easy.
Now, for all you orchid lovers out there, don't worry,  I am still working on the orchid pattern - just not right now.  It will be a great one day class for the future.  Maybe at the next quilt show near you? 

Tuesday, November 6, 2012

Its Here at Last


Stop the presses!  Hold the wire and kick the cat! I think that might be kick the can?  Oh, well...that explains why the neighbor cat doesn't come around anymore.   I have exciting news - my book, Cutting Garden Quilts has just been reprinted.  Martingale/Patchwork Place is the publisher.  I think this is the fourth printing, but who is counting?   They arrived  just in time for my trip to the International Quilt Festival in Houston this last week.  I did feel a little sorry for my UPS driver having to pack the 4 heavy cases up the 8 steep stairs of my cute country porch in the rain.  Joe is now carrying the cases off my cute country porch back down to the garage in the rain.  Those books go more places than I do.  I love men with muscles but if UPS guy and Joe ever compare stories I may end up having to move all my stuff myself.   Happy to say the case sold out in 4 days of classes and I didn't have enough for the Saturday sampler.

Well, happy days are here.  I do not mind that I had to cut a deal to get the book back out,  it's worth it.  Why? you may ask. This is the one and only first book that shows you how to create a flower quilt from your own flower photo as an artist paints a painting.  It's like having me in your sewing room helping you or messing up your sewing room just like I do here at home.  What could be better than that? You cannot get the basics of my technique, unless you get the opportunity to take a class,  anywhere except in Cutting Garden Quilts.  Yes, I have learned so much more over the last 5 years of teaching you, my students, and I will be putting that in the next book but the basics are a classic to build upon.  As my art teacher always said, Melinda, you cannot break the rules until you know the rules.


The pictures and layout are one of the best.  It is like a fine coffee table book.  The book also has 5 flower patterns that turn out beautifully. Many of my students have won ribbons on the quilts they have made from this book.  Love That!

This peach rose is called Just Joey.  It was given to my husband by my mother after Joey's Mother died.  She always called him Joey.  It produces wonder fragrant flowers in our garden and can now bloom in your home.   I recently sold this quilt to a wonderful quilt collector couple on Cape Cod.  That was how I was able to get Joe to go to Australia with me.

I have learned many new tricks since writing this book but the basics of developing your own flower into an art quilt is still the same.

I love this flower, the clematis.  I just taught 3 fabulous classes in Peoria, Illinois and one of the classes was the clematis.   I had a great time and the clematis flower class was from this book.  Here are some of the pictures of their wonderful flowers.


You can now go to my web site and order your book if you do not already have it.   If you have it, but can’t find it (believe me, it happens) you may need another.


I love this student.  She was bold and creative and not afraid of color in any way. Her flower turned out amazing.  The only other student that has done this color way was Helen in Ukiah, California and she rocks!


If, you like, I will sign the book to whomever you want.  Christmas is right around the corner and this would make a great gift.  It is a classic because when the publisher stopped printing this book about 5 months ago, the book was selling on  Amazon.com  for up to $1,000 a copy.   So hold on to this one because if I have an an  .. unforeseen accident, and there are a few here in town that have me on their short list, this book could really be worth something.  Enjoy!  And a big Thank You to Martingale for re printing this valuable book.

Tuesday, October 9, 2012

Renegade Thread Play Coloring Class


Renegade Thread Play Coloring Class
The Next Step


There has been some confusion about my Renegade Thread Play class in Houston on November the 2. So let clear up all the mess so you can feel prepared for the class.  This is a techniques class, but we will be making a flower to practice on.
We start with the basics of what Renegade Thread Play is.  Then we will practice a verity of stitches.  Work out all the kinks and hopefully after lunch, we will start our flowers and use the stitches you have just learned.  
The pattern we will use is my sunflower.  However, it does not have to be a sunflower.  Make it in the colors you like.  So bring your favorite flower colors to class.  Here is a value chart to help you with fabric amounts next to each value.  You will also need three greens that you like with your flower.  Fat quarters yards work great.


You will also need a background fabric, cut to 18” x 22”.  A low loaf cotton-batting cut to 30”x 30”.
For the back of your quilt, you will need 1 yard of any fabric you like, to use as a fabric border on your quilt and as the back of your quilt.  A few medium size safety pins to hold your quilt layer together, quilting gloves, 1 spool of Aurfil 50 weight cotton thread in a color that blends with your backing fabric colors.  1 package of Jeans Denim or Top Stitch Needles, Size 80/12, white chalk pencil.


I will bring some fabric kits if your bags are just to full. Any question, please email me. melbula@comcast.net


Thursday, September 27, 2012

Running with Scissors?

mary michaela murray

The right scissors can make your job so much easier.   What kind do you have in you sewing room?
I thought so!

Running with scissors was a big no-no as a child.  We where told never to run with scissors. Mothers and grandmothers for  hundreds of years would tell us horrible stories about kids that ran with scissors so right away I was afraid of the dangers of  this very sharp tool that now had to be respected and used with care.  We were taught to walk with the points down even across a small room.  After cutting we would lay them down oh so carefully and if small children came into the room, we would  remove these dangerous demons quickly to a higher shelf.   That's why dad could ever find the scissors - he didn't look up.


I remember my sister and I where sick with chicken pox and dad brought us home each a big box of paper dolls. It was like Christmas to me but trying to cut paper with those little blue plastic round tip scissors just made me so frustrated. So after a couple of hours try to cut paper with a stick, I quietly got out of bed, tippy-toed down to my mother's sewing room and "borrowed" her scissors.  That is when I learned that you aren't supposed to cut paper with mom's "good" scissors!  Searching for the "good" scissors was a weekly ritual in our house and someone usually got a spanking when the "good" scissors where found and it was usually me!

The problem I see with this shock and awe toward the mighty, sharp scissors is that it has created a fear that is associated with using them. Some of us still carry that fear.  I see it all the time in class.  The fear comes out in the kind of scissors we bring to class.  Old, dull, bent, rusty, the wrong size or some bought because Kmart had a deal.

It's as if, before we leave the house for a class, we open the family junk drawer in the kitchen (don't be ashamed, we all have one, even Martha Stewart) and just grab whatever we can find. In my house those scissors may have cut wire, quartered a chicken and dad probably cut his toenails with them. Yikes!
Then we get to class and struggle to make a clean, nice cut into fabric but all we get is a raveled,  shredded, mess. The other fear is the price. It costs too much.  $35.00 is way too much?  Well yes, if you're cutting your toenails with them, but not if you are creating a beautiful garment or quilt.   Now, would your husband or partner think about the price when buying a hammer, computer or new motorcycle helmet? Never!  We need the right tools for the job.  It took me years before I bought myself a good pare of  Gingers.  After my first cut I was hooked and I wondered why I waited so long.  I was afraid to spend the money on a tool for my little hobby.  Was I not worthy of the almighty, very sharp scissors?

We all go and get new blades for our rotary cutters but then come to class with the oldest, dullest scissors that don't even cut bread.


We can't sew without scissors. No rotary cutter will ever take the place of a good pair of scissors.  I want you to make sure that you have at least 4 good pairs of scissors in your sewing room.  I didn't get mine all at once. It is like a fine collection, you add one at a time. My dream sewing room would have 50 scissors at every station and then I'd fill the kitchen junk drawer with the Kmart specials.

Here are some of my favorites:

1. Larger, heavy 8" dressmaker shears like Gingers. I have 2 pairs, one for fusible art quilts and one for regular fabrics.

2. Medium size with a serrated edge. I just got a pair of Karen Kay Buckley's new scissors that I love.

3. Small, sharp embroidery.  These are so sharp and pointy I have cut my fingers on them many times but these are a must for applique. I have them in every project bag.

4. Thread snips.  I like the models with the curved tips and keep them by the sewing machine at all times. Don't cut fabric with them, they are just for thread.  I learned that the hard way.

Now you can fill in your collection with your favorites. The more scissors, the better, and, by all means, get dad a new pair of toenail cutters.


Saturday, September 22, 2012

Everything is Upside Down


Today, everything seems to be upside down.  Not just because I am dyslexic and look at things that way but because I think the world is just crazy right now.  Here at the homestead we have had a really frustrating couple of weeks.

I was trying to help my husband out with his crazy schedule, so I got him a gardener and a pool guy to take a little of the pressure off him. I know, I am such a great wife.  But within  the week the new gardener broke our sprinklers and the main water pipe coming into our house.  The new pool guy said our pool sweep was bad and we needed a new one at $$$$$, and my computer died.

So we come home last weekend from visiting our son and had no water. It is now Wednesday and we still have no water. That means no shower and, worst of all, no dying fabric.

Joe is soldering the water pipe out in the front yard as I write this. Joe found the pool problem - it was just a hole in the filter bag, an easy $35 to fix.  Someone is getting fired.

OK, before you get your violin out and play me a sad song, it really isn’t that bad compared to many of the years Joe and I had real struggles. I was trying to remind him of that last night as steam was shooting out of his ears trying to solder the pipe in the dark.  I have found that screaming at your husband to "calm down - you're going to have a heart attack" may not be the best advice.

How quickly we forget that not to long ago our lives where a constant struggle. One right after another. Sometimes 2 or 3 at a time.  Back then I wish it was just a broken water pipe but we all have them, things like serious health problems, family problems, finances, IRS, threat of being sued, yellow house incidents, drug addicted neighbor problems. OK, maybe yours are a little different.

Lets just say our faith in our fellow man is rapidly fading this week.

I guess it stared when I asked Joe to help me with my computer problems, which I seem to do all the time. I do have a direct connection to my own personal Geek Squad just a shout away.   He will patiently sit down and fix whatever mess I usually cause.   But this time it wasn’t me.  And it was really bad!
Wednesday, October 31:  Fabulous Fusible Flowers - Zinnia
While my sweet man was working on my computer he accidental knocked it to the floor.  And                                  that was the end.  Now fade to black if you’re inclined to act this scene out. 

It went downhill from there. So for the last 2 weeks I have had no emails, no calendar, no contacts. You get the picture?  And I forgot the best (worst) part - no photos.
Now the good part.  This amazing man has somehow fixed most of my computer by switching out the thing a ma-jig and downloading the widget and crossing the thing a de bob with the giz-mo and somehow I'm able to write this blog. I still cant take a shower but we are roughing it this week.


But my pictures are still a problem.  It seems that I like to take photos and there are hundreds of thousands in my computer.  That’s why I was having problem in the first place.  Photos take up lot of megs or midgets or something like that.  So when I went to write this blog there are no pictures of the Zinnia to show you for the upcoming class in Houston.  So I took more photos with my iPhone because my son still has my good camera (which I will never see again) and I downloaded the new pics and they all keep showing up upside down.  So I would rotate them and then they would still show up on the blog upside down.  Isn’t this fun?
So welcome to my world that is always in a state of crazy. And if you are moved to leave a comment that I should  have backed up my computer, I will come and get you. 


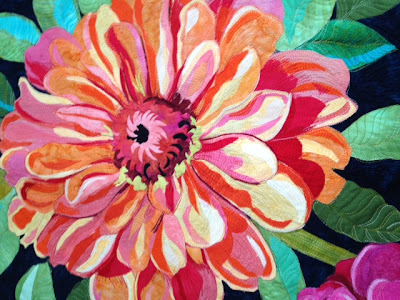
So here are the new pictures of the old Zinnia.  I am making up lots of different colored fabric kits for our classes so hopefully you can get the color you like. I will also make extra kits. Well, that is when we get the water back on.

For the class you will need to bring a yard of background fabric.  The yard is more than you will need but you may want to be creative after I show you some new ideas I have for this pattern. The color can be any color you would like your flower to be on.   The more choices you bring, the better. Black is always safe.  If you don’t like what you brought we can get more at lunch time. We are at the biggest quilt shop in the world!

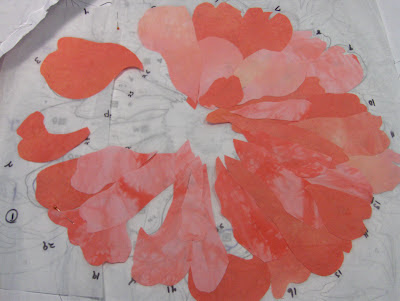
HINT: In most applique classes you start with the background fabric, but not in my class. We will start with our flower petals first, then (about after lunch) add the best background color to the petals. We want our flower to pop off the page so I wait until you can see how it is developing to add the best background color. I will also give you some tips and tricks to help you pick the right colors.
Work on the petals first.
I just want you to know I will not leave you hanging in class.  I will help you all along the way. You won't be without any water, so to speak.  I want you to be successful and get what you paid for.
Then add the background fabric!
Then I will show you how to add other fabric colors that aren't in the pattern to add sparkle and highlights to your flower and makes it yours.
 Here I added some turquoise blue for sparkle on the leaves.
Thread Play on the back.
I will give you information in class on how to do the Renegade Thread Play to finish off your quilt when you get home.
Thanks to those of you who kept reading to the bottom of this blog.  I love this flower, even if the pictures want to be upside down.  If you have any questions about class or plumbing please email me at melbula@comcast.net.  I am here to help, even if I send you a picture that might be upside down.  Got to go, the real plumber just arrived.  Hooray!

Wednesday, September 12, 2012

Classes for Houston

Sorry I haven't written in a while - it’s been crazy around here. But what is new?  Had a wonderful time teaching at the AQS Grand Rapids show in August and can’t wait to do it again next year.  But now it's time to get ready for the Big Show and I don't mean the Ringling Brothers are in town!  I mean that other big Circus, the International Quilt Festival in Houston, Texas.  If you have never been you have to go once in your life.  It is always amazing and very creative and inspirational.  

I have been working hard on my quilt for the silent auctions.  Last years winner got a really good deal on a fabulous, one of a kind quilt designed and made by me.  Here is this years quilt called "Fuchsia". Who is going to be the lucky winner?  I can't wait to see.  And Mom, if you are reading this, you can't bid.

Thread work on the back.
This year at IQA I am teaching and then teaching and a little more teaching.   So I wanted to get you and myself prepared for the Big Show.  If you have signed up for one of my classes here is some more information about them.  Over the next few weeks I will talk about the classes and my process in dying the fabrics and answer any questions you may have about the classes and what to bring.  If you’re not signed up you will miss all the fun.  Plus, I share with my students tips and tricks that I have learned over the years and share any mishaps that might be going on.  Usually they involve me, myself and I and some wacky incidents. What am I saying? It always involves me and something stupid. Last year’s show was no exception - just read about my windy day dress incident in a past blog.  I don’t plan on repeating that one.
Here are the days and classes I am teaching:


Tuesday, October 30:       Fabulous Fusible Flowers  - Bluebonnet
Wednesday, October 31:  Fabulous Fusible Flowers - Zinnia
Thursday, November 1:   Fabulous Fusible Flowers - Bluebonnet
Friday, November 2:       Renegade Thread Play
Saturday, November 3:   Saturday Sampler - 10am - noon
Sunday, November 4:      Sleep in and see the show then go home and sleep some more.


So let's start with the Texas Bluebonnet Class. Now, if you are from another state you will notice that we all  have a similar flower called by a different name and they may vary in color and size in each state.  In Texas is it called a bluebonnet   Here in California it's called the lupine.
  
I even have an oil painting by my grandmother, Lois, that she painted of bluebonnets in a field in Texas
It is a fun and striking flower to have and make. And all skill levels are welcome. Grandma would have loved this.

The class includes a hand dyed fabric kit with all the flower and leaf fabrics to make your bluebonnet. I have been busy hand-dying the fabrics and they look great.

You need 1 yard of a background fabric that you want to see your flowers on.  If you are not sure what background to bring, it always safe to bring a lot to choose from.  I will help you make that decision and give you some great tips on how to pick the right color for your flowers.  Remember, we have a 2 hour lunch and you can always go shopping.  I know its tough but someone has to do it.

We don’t start with the background fabric - we start with the flowers then add the background.  I have a few tricks up my sleeve. Whee! 

Email me or leave a comment if you have any questions.

Sunday, August 12, 2012

Australia

Australia was fantastic, even in winter. But I have to say, Joe was right, it is just like Southern California only they talk funny. 
Us in front of Berrima Patchwork in the cute historic town of Berrima, NSW.

Thank you to Sue and Tamsin for inviting Joe and I to their 
first of many Quilting In the Highlands.
That's my Rain Drops quilt on the wall that Tamsin won at last years IQA silent auction in Houston.
Wait until you see what I am making for this year's auction.
After our long 16 hours of flying we got right in to the swing of things. Tamsin took us all on a tour of the  cute town of Berrima in New South Wales.  They are known for their notorious prison and the trials that were held there.
 
 Joe trying to break into the prison  Maybe to get away from all us girls?
 The old court house that we toured. It's haunted, you know!

 This is a quilt that was made by many of the quilters in the area and donated to the
court house in 2006 for the town's centennial.

Carol, Sherry, me, Sue and Joe (teacher's pet).

 Carol Doak and Joe goofing off. Again.

 I still don't know who this is characters is but Joe liked him right way.
Maybe it was the hat? 
Australia has lots of characters so Joe fit right in.

Lots of cute little shops and cafes filled this small quaint town.  Plus, they have a quilt shop.


Every night there was  beautiful sunset.

All the teachers love Bernina.  Lessa Chandler, Carol Doak, Michelle Hill, Sue Dennis, and me. 
Thanks to Bernina for the sewing machines.

 Learned a quicker, better, faster, technique for adding the center to the hibiscus. 


The food was wonderful I think it was the best retreat food I have ever had.

 Joe and his favorite girls, Sherry and Carol Doak. It seemed like all we did was eat.  And yes that little Sherry ate that whole big sandwich.

Display of some of the teacher's quilts. Carlo Doak's quilt on the wall
and Sue Dennis' quilts on the table.


Michelle Hill's beautiful quilt. She taught the William Morris Garden Workshop.  
She has written 2 books on William Morris and his designs.

 My first ever Waratah class. It took me a whole week to be able to properly pronounce Waratah right.


 Showing the Renegade Thread Play.

 Class rooms where great.
 Leesa Chandler showing her applique tricks and techniques.

Sue Dennis and I.  Her work is awesome. 

 Carol and I in a race to see who can sign their books the fastest. I won!
Only because she has way more books than me. Darn.

Teacher book table. Those are all of Carol's books on that table, except for my Cutting Garden Quilts. Which I'm  happy to say is being reprinted!

 Love this color of Hibiscus. Hope i can remember how to dye this colorway again.


 When the green leaves are added magic happened. Greens have a special power to make or break your flower quilt.
By the second day the students fingers where getting sore from all the cutting.
There always is a lot of cutting.  
So happy to see that my hand-dyed fabrics turned out so good.  It was great to see the flowers on very different backgrounds.
Thank you Berrima Patchwork and Quilting.  Check out the information about next years 2013 retreat.