Monday, June 13, 2011

Nuno Felting?


Who knew that a ball of colored wool roving and silk chiffon would thrill me? Well, it happened and it's Peggy's fault.  I like to pass the blame whenever I can.  
Hand-dyed silk chiffon.

It all happened on a foggy and rainy Sacramento day, which we have been having for the last 8 months.  My friend, Peggy, a knitter and yarn devotee took a class and when she called with excitement in her voice I knew it was something fun!  She is always finding the newest and most artistic craft/sewing/wearable ideas.  I love it. She said she had just taken a class on felting silk scarves and that I was going to love it. She was right!

She came to my house and walked in with a beautiful felted silk scarf. I knew she was experimenting with felting but I had no idea you could make anything but cute little animals with the felt (which I have made and stabbed my finger numerous times with the needle. Not fun).  But a wearable, that’s another thing. I love wearable art.  This technique is called nuno felting, which is felting with water and friction.  No needles, so no blood.  Hooray!!!!
Peggy and Susan agitating the silk.

 That night I made my first creation.  Of course, it was also when I was making Joe dinner as Peggy gave the directions over the phone again.

I started out with silk chiffon scarves.  14” x 2 yards.  Then I  hand-dyed it. The silk sucks up the dye pretty fast.  I had bought a bag of beautiful pastel color roving a while ago, never really sure what to do with it. It was just so pretty and soft.  So the game was on.

Peggy said I needed a long strip of bubble pool cover plastic. Don’t have, but do have bubble wrap. You need a PVC pipe. Don’t have, but do have strong cardboard tubing. You need nylon netting. Don’t have, but do have bridal tool. Game on!  This is called being creative with what you have. I am the queen of that.

I laid out the scarf on the bubble wrap and added the roving, trying to make a flower design, of course. Laid the netting over my creation, wet it with hot soapy water and rolled it up on the tube, tying it with string, and began the wet felting process. You roll it back and forth with you arms, from your elbows to your hands back and forth, back and forth.  About 25 times for 4 repetitions, then 50, then up to 400-600 rolls, checking the piece and making sure the netting is not felting to the wool.

Peggy had a girl in her class that wore a pedometer which measures your movement and how many calories you are burning while felting.  It determined that you can burn up to 600 calories when making one scarf.  Now that’s my kind of exercise.

I asked Peggy if she would demo the technique at Flowers On the Lake.  The demo was a hit as the girls loved it.  I couldn't wait to get home and try more ideas.

Hey, how about dyeing your own fabric and roving to match?  Stay tuned!

Tuesday, June 7, 2011

It Snowed AGAIN!

View from our class room. Its snowing on the other side of the lake.

I have spent the last 2 days in my pink flannel (Christmas sock monkey) jammies.  No, I don’t have a cold.  It’s just the coziest outfit I have and it’s pink.  I am just resting up after a fun and busy week at my Flowers on the Lake retreat on beautiful Lake Tahoe.   

The water is so clear.

Pearl taking a break.

Helen and her vibrant clematis.
You know you must have had a good time even though your feet still hurt and you have slept 12 hours straight for 2 days but there is still a smile on your face.  At one point I did question if I had bit off more than I could chew as I tried to meet the needs of a room full of 20 panicky women on that first day. The first day of all classes you have a room full of big eyes with questioning looks.

Kathy's sunflower.

Gale's roses.

We had some exciting moments and I learned that I can’t do it all.  But I can’t wait to try it again next year.

Starting to snow on the lake.

We did have some exciting moment when one of the students got sick and we had to call the fire department for help. Nothing perks up a group of woman quicker than cute young firemen walking through the room. Makes you forget you where just in a panic.

The weather was crazy. But it seems to be crazy this year all over the country. Is God trying to say something?  So, of course it did snow the second day and the girls from Arizona got all excited.  
It's only June 1.  Why not snow?

Pat and Cathy in the snow.

The student that traveled the farthest to the retreat was Donna. She and her husband came all the way from Massachusetts where it was 95 degrees and humid. Thank God she brought a sweater at the last minute.
Thread Play on a coneflower.

Claire's hibiscus.


Jan's zinnia 

Linda working hard!

Joe and I talked and I am going to try it again next May.  I like the end of May because we have the whole place to ourselves.  It’s quiet and peaceful.  
View from above!


On the last night I stood up on the second floor and looked down at the class as they worked so intensely. I was pooped, but the room was filled with beautiful colors and you could feel the spark of creativity.  Some sat contently, admiring their finished flower. 

Donna's inspiration photo.
She's got it!

Kim's zinnia.

Dede working on a fabulous quilt she started in a Janet Fogg class.

Cheri's clematis from her own hand dyed fabrics.

Leila and her flowers.

Ruby's hibiscus from her husband's photo.
I felt like a proud mother watching the group.  I thought to myself, who would have predicted that the little dyslexic girl, who felt so retarded at one point in her life, would have a group of talented, dynamic women drive 100s of miles to take a class from her?  God is so good!  


Hope to see you next year! If not at Tahoe maybe in New York in December at the Hudson River Valley Art Rhttp://www.artworkshops.com/

Wednesday, May 11, 2011

Yards (and yards) of Thread

Painting by Delilah Smith 
   (Second time posting this blog.  Blogger seems to have lost everyone's blogs this week.)


Today I counted how many spools of thread I have gone through since I started quilting Monet in Pasadena.  So far it's 3,600 yards. That's a lot and I just started.  I think it's starting to look good.  Whenever I start a new quilt the first few days are frustrating and pure torture and I hate everything I am doing. I just want to throw it away.  Joe will tell you I am not a happy camper. That must be the temperamental artist in me.  I hate being like that.   Then I turn a corner and, hopefully, start to see it coming to life.

Here are some tools I can’t live without when quilting: tweezers, stilettos, curved-tip snips, sticky tape roller (you might call a lint roller), and a curved-tip knife, which is really a scalpel, I think. These are all my fix-it tools.  That means YES I can take out and put back in my stitches as I go.  It’s like having a big  eraser.  If you spell a word wrong you can just erase it.  The eraser has always been a very useful and much needed tool in my life.  I used to get so mad at myself in school after erasing so many words on the page that the paper looked really messy.   But I guess that was preparing me for now. 
I call what I am doing sketching or coloring with my thread.  Some call this quilting. But I don’t think that is what I am really doing. Yes, I am quilting the 3 layers together, but it’s more like weaving the colors of fabric together with the thread.  I am visualizing as I quilt that I have a crayon in my hand and I am filling in and adding detail with the crayon/thread.  I focus on one small space at a time.  That way I don't get overwhelmed or distracted.  I roll, fold, smush and squeeze my quilt to get the area I want to work on under my needle. This is a home machine I am using, a Bernina 158.


I have also been using a thread conditioner called Sewer Add. This helps the rayon thread not to fray too much, which it will do because it is rayon and going through heavy fabrics. But don’t get it confused with the Fray Check bottle - they look alike in the bottom of a drawer.
Back of the quilt.

I am also using some 40 weight thread along with my normal 30 weight rayon thread.  The quilt is  predominantly blues and greens.  I felt I needed more shades of blue and green thread to add the depth and detail.  The 40 weight thread comes in more colors.  I still like the look of the 30 weight but sometimes having the right color is more important than the weight of the thread.  It reminded me of how wonderful it was to have the big box of 64 colors of crayons as opposed to the 8 pack.  Even back then it was all about the color. Remember the sharpener that came on the back of the box?  I thought that was so cool.

Today I will be buying more bobbins, too.   I thought I had enough but since I need a bobbin for every color I am using I am going to splurge on a few more. Having the right tools and supplies to work with makes all the difference.

P.S. I read a blogging forum lately that suggests removing music from your site, saying that most people find it irritating. What do you think?

Monday, May 2, 2011

Stitch, stitch, STITCH!

I just bought a new iron today and it's pink! Will it not fall on the floor and break?...I don't know but I have been having that problem with irons that like to jump off my ironing board, crash to the floor and then leak water all over my quilts. So I'm hoping that this beautiful pink one will not be so jumpy. Besides, it goes with my studio.
The picture I took at the Huntington Gardens in Pasadena, CA.
A big deadline is looming over my head as I finish my Monet in Pasadena quilt. The quilt has been done since last year but I have not had time to quilt it until now.  So I made a large order to my favorite thread guy, Mike at speedstitch.com. I will hide the thread bill from my husband, as all good wives do. Bought 2 packs of new needles and  cleaned out the dust bunnies hidng in my machine then revved up the old girl I call Bertha but better know as a Bernina 158.

I love to do big quilts but maneuvering the large and heavy quilt under the machine can move the layers if you don’t have it pinned or basted really well and I've been using safety pins in the past.

On small quilts I can just safety pin the layer and start stitching in the middle and work out but not on this big girl so I tried a new pin basting device that I got from the Cotton Patch store when teaching at Asilomar.  It's a rubber plug or stop that you put on the sharp tip of your quilting straight pins. Brilliant idea. 

The new pin basting device I tried.  I think it will work better without all the fusible web.
But it didn't work that great with the fusible web.  I kept bending the straight pins trying to push it in and take it out. Now I have 50 bent pins.  Then I had an idea.  How about trying a free motion basting using really large stitches that can easily be taken out?  It’s about time to dust off the old seam ripper, if I can find it. 

My free motion basting.
But to get those big 1/2 inch stitches, I had to move my hand and the quilt really fast and my foot on the peddle has to go  really slow.  It was a little tricky at first but it seems to be working so far.

I need at least 3 weeks of solid quilting to get it done.   But only have 2 weeks to work. I guess it going to be take-out, for a few weeks. 

Friday, April 29, 2011

Pattern Success!

Well, the zinnia pattern seems to be a big hit. Just taught a 2 day class up in Pine Grove, CA, beautiful country just 45 minutes from my house.  It  reminds me a lot of Ireland without all the castles.  Anyways, there were 15 students in this class and they all brought their own color choices and all the flowers were beautiful.  This is not the easiest pattern in my collection as it has many layers but turns out wonderful.   I love watching them grow and bloom in class.  I will be teaching this again in Sisters in July and at Thimble Creek in August.  Check my calendar for more info.

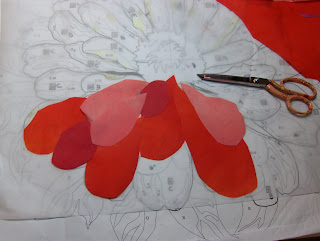
You prepare 3 different color charts for each flower.  The best way to do that is to make black and white copies of the original color chart that comes with all my patterns.  With a black and white copy you just see the values of the colors and how they relate to each other and it makes it much easier to change your color palate.  Easy probably isn't the right word.  You are taking the pattern pieces for color A and pinning it to all 3 layers of  the  A fabrics on the color chart and cutting them out all at once.  

Then you would lay the cut fabrics down on the background for all 3 flowers, then do the same for the next color in the color chart, and so on.   I think there are 21 different fabrics in the pattern.  Beside sore thumbs I think I heard a little whimpering on the 3rd day.  They worked hard and persevered. I was so proud.

But last week at the Empty Spools Seminars in Pacific Grove, I had 2 very brave students who wanted to do a 3 zinnia quilt inspired by one of my quilts.  It's  a sample to show the variety of colors you could make the flower in.  I never thought that someone would want to take on the challenge of doing 3 different colors at the same time.  I thought I was the only one crazy enough to try to cut out all 3 color ways at the same time.  But, no!!!!  These girl where determined. 


That is just it.  You have to persevere through the hard parts to reap the rewards and everyone’s level of perseverance is different.  Each student comes to my classes at a different level, battling different fears and challenges.  That is what is so exciting.  But, of course, there is the naysayer  observing this from afar.

Melissa's

Nancy's
I had a student tell me one day at lunch that someone expressed to her, “I don’t know how you can even work from someone else's pattern.”   What!  If I had heard that statement or knew who that was,  I would  slap them.   We are all different.   People think they are diverse and open minded but they are not.  Let's check ourselves before we make stupid statements.  I know a group of girls that believe very strongly in diversity as long as it lines up with their beliefs and it also trickles into the quilting community.  Have you met that person who thinks it not legitimate quilting if it’s not done a certain way?  That’s not being open minded, diverse, or even polite.  

So, we in the quilting world need to cut each other some slack and, if you come to one of my classes, please know that I will help you, whatever level you are at.  At least I will try my very best.  Remember, its only fabric and we can get more.  Unless, of course, you are in Ierland and then you had better conserve.